I'm still in New York, typing this on my phone.
We are having a great time with the kids.
Got to Michael s and Hobby Lobby. I finally managed to get that fancy oval Spellbinders I've wanted for at least a year, but neither place had any of the others that I've wanted. HL doesn't have Graphic 45 anymore, so didn't get that this year. Neither place had Stampamajig either.
I finally found a set of 12 Twinkling H20s, which I've wanted foreverx and can't wait to try them! They also had the six pack of lighter colors that you use for shading and highlighting and stuff.
Got quite a few sheets of paper on sale, but neither place had glossy card stock. Also got more Copics and two of those plastic cases that hold 36 markers. I don't have 36 Copics yet, but I want to be ready for when I do!
Got a few cheap punches, and two MS stamp and punch ones. A flower and a butterfly. They look like you could do something interesting with them.
Also got the Stampendous mica flake set, and a set with glitters, and a brilliance ink pad. I forgot the color name, and everything is packed up, but I think it's white with gold shimmers.
I can't wait to play with my new toys!
We will probably leave Rochester tomorrow, spend the night in Sturbridge, MA, and get home on New Years evening. See you all then, or the next day!
Oh, if there are any strange words in this post, it's because I'm not great at typing on the phone.
Have a wonderful New year!
Pazzles Bar

Sunday, December 30, 2012
Monday, December 24, 2012
Noor! Dies and Gilded Roses Card

Finished this card by candle light while the power was out. Also took the photo by candle light. Will post details when we get back from our trip.
I wish you all the best holidays ever!!!
Now that I'm back, I'll add to the description of this card.
All layers are dimensional, and matted with gold mirror card. The paper on the bottom layer is from K&Co, and the paper on the middle layer is from my stash.
The rose is an old Anna Griffin stamp, and was stamped onto Core'dinations Pearl using VersaMark, and embossed with gold EP, then colored with Copics.
The corners on the bottom layer were cut and embossed using a Noor! die, and shaded with Brilliance ink. The corners on the middle layer are gold outline stickers.
To finish, I added gold and pink liquid pearls, and some very tiny metallic gold punchouts from the outline stickers.
Sunday, December 23, 2012
Gilded Roses Card

Sorry about the photo. Our power went out the day before we left, and I took this by candle light.
Am posting early in the morning before we leave and scheduling this to go live while we are gone. I'll do better photos and details when we get back.
Have a wonderful Christmas everyone!
We are back from our trip, so I thought I would add to this post.
The background paper is some I've had in my stash for a few years. I loved this paper, it has a pearl sheen to it and looks like victorian wall paper. The rest of the layers are Core'dinations pearl. They were cut with Spellbinders labels four and grand labels four. The center pink layer was colored by applying Brilliance ink with a sponge dauber, and I lightly sponged galaxy gold around the stamped image. All the layers were outlined with a metallic gold pen and mounted dimensionally.
The stamping was done with VersaMark and embossed with gold, then colored with Copics. The stamp is a very old one from Anna Griffin.
The foliage was cut from a pearlized green paper using the MS branch punch, and the roses were some I bought a long time ago.
The bow is one I made from sheer pink ribbon.
Saturday, December 22, 2012
Embossed Background Lace Card

Hopefully as you see this, I will be on my way to Mass and NY to visit with family for the holidays. I am scheduling a few posts to appear while I'm gone. Since I probably won't get much chance to visit you all until I get back, I hope you have a wonderful holiday season!
This card was made with one of the backgrounds I made a couple of days ago. The matting was made by using the Brilliance Sky Blue and Gold inks I used for the embossing, and a gold pen was run around the outside of the embossed layer. The EF is from Darice.
After mounting the background layers onto the card, I cut a bunch of Spellbinders that I thought would make a snowflake like design from Core'dinations white pearl CS. One motif was cut into quarters for the corners.
The same inks were added to the die cuts with a sponge dauber, then everything was mounted dimensionally onto the card.
Last, I added pearls and Liquid pearls to the die cuts. I thought this would make a good winter card.
Friday, December 21, 2012
Bird Christmas Ornament ODBDSLC135


I made this ornament for Our Daily Bread Designs Challenge Snowflake or Snow.
For the ornament I used the ODBD sets Cardinal Ornament and Chickadee Ornament. These were stamped onto Core'dinations white pearl CS using VersaMark, and embossed with gold EP.
I cut the stampings out with a larger Spellbinders circle than usual, then cut 10 circular frames out of heavy CS (it was the backing sheet of several paper packs). I mounted the two stampings back to back with a piece of butcher's twine inside for a hanger, then glued five of the frames to each side of the stampings. I used silicone glue to ensure that there wouldn't be any leaks. This seemed easier and less expensive than using foam tape.
After that, I cut two pieces of acetate for the windows, and put glitter for snow in before adding the windows. After that, more silicone glue was spread around the outside edges of the ornament, and narrow gold ribbon was put around the ornament to cover the layers.
Then I cut out two more circular frames using Spellbinders dies, and added those to the ornaments using more silicone glue. Gold glitter was poured onto the lacy part of the frame and pushed into the glue which was exposed by the holes in the frames, and the excess was poured off. A paint brush was used to brush off any remaining glitter.
Last, a gold bow, white foliage, crystal snowflake, and diamond Stickles were added to both sides of the ornament.
Thursday, December 20, 2012
Embossed Background Butterfly Card and Playing with Embossing Folders

Today I was going to try the Faux Patina Technique, but got sidetracked and played with embossing folders instead. My results are below.
The background on this card is one of the backgrounds I made while playing. It was done with a Darice EF, and uses Brilliance Sky Blue and Cosmic Gold, and Memento Bamboo Leaves.
I made matching mats for the cards by going around white CS with the same ink pads and my daubers.
The backing for the sentiment is from Our Daily Bread Designs Eternity Set, and the sentiment is from JustRite's Botanical Medallions and Banners Set. They were stamped on Core'dinations White Pearl CS using VersaMark, and Embossed with gold EP, then cut and embossed using ODBD's Elegant Ovals custom dies by Spellbinders. Then I edged them with a gold pen and mounted both layers dimensionally.
To finish the card, I punched some MS Monarch Butterflies, and used my daubers to add some blue to each. Last, I did the bodies and the edges with the gold pen. (It's shiny in real life). Then, I added some roses and foliage from the MS Branch Punch, and added a few pearls.

These are the embossed papers I made. They are prettier in real life. They didn't photograph as well in the group as they do singly. The one in the top right corner is the one I used in my card above, and you can see it looks a lot better on the card than it does in this group photo.
All the ink was either Brilliance or Memento, except for a few, which used Distress Antique Linen as well.
I began by using the Antique Linen on the embossing folder, and it looked so nice, that I left it as is, to use on a card later. It's the first time I've had any luck doing the letterpress technique. Then I began layering other colors on cards, but I didn't finish them off with the VersaMark and Embossing Powders because I liked them the way they were.
After I did a few like that, I began wondering how they would look with only two colors, so I made a green one and added gold to the embossing. Then I tried pink and gold, then blue and gold.
It was really fun, and now I have a bunch of backgrounds to make cards from!
This morning our hearts are heavy with grief here on the island. Two fishermen from here were lost while scalloping off Cape Cod. They have been missing since about noon time on Saturday. This morning the coast Guard called off the search.
It's very common for the men from the island to fish off shore. My husband fished in that area for years.
Wednesday, December 19, 2012
White Congratulations Card

This one was really difficult to photograph. In person, it is much prettier. The sparkles are very sparkly, and the edges of the ribbon are white with a touch of iridescence, not pink.
I used Brilliance Platinum for all the stamping, and wanted to use clear embossing powder, but my clear powder is very old, and in those days, the EP didn't work as nicely as what we have now, so I used a different sparkly one I had. I made the card several days ago, and tried quite a few different kinds until I found one which didn't change the color of the ink. I think I used Pink Champagne. (Senior moment here, I have a lot of them)! :-)
The lattice background stamp is an old one from Anna Griffin, and so is the congratulations one. The paper is Core'dinations Pearl. The sparkly layer near the bottom is the same Core'dinations paper, but I went around it with the platinum ink and embossed it with the same EP as the lattice and motif.
The center motif was cut and embossed with two different Spellbinders dies, and both were mounted dimensionally. After I finished the card, I used diamond Stickles to add dots to the lattice and other areas of the card.
Tuesday, December 18, 2012
Butterfly Fancy Fold Card


It's been quite a few years since I've made one of these cards. For this card, I used the Mariposa Stack by DCWV. All the ink is Brilliance Cosmic Copper, and the EP is Tsukineko Sparkle.
For the card base, I used one sheet of DP folded so the design is on the inside. Then I used another sheet for the inside window part. Next I used the same green print on the front of the card as I used inside the window, and cut a matching border from the same yellow DP, and punched it with a MS edge punch and added it to the front of the card.
For the sentiment, I used Our Daily Bread Designs Eternity stamp set, and their matching Elegant Ovals custom die by Spellbinders. Those were mounted dimensionally to the front of the card, and green Stickles were added to the scalloped border on the DP.
On the inside, I punched a bunch of tiny MS butterflies and added them to the green DP inside the window.
The large 3-D butterfly is from the Spellbinders Wonderful Wings set, and was cut from the same yellow DP. First, I ran a sheet through my Xyron, then cut and embossed the butterfly four times. I removed the backing sheet from half of two butterflies and stuck them together. Then, I kept adding butterflies until I came to the last set of wings. I put a bamboo skewer into the center, and adhered the last two wings.
Now, I'm glad I used my Xyron, because it kept everything lined up nicely, but unfortunately this new refill of permanent Xyron stuff doesn't stick too well for some reason, so I slid the butterfly down the stick a ways, and put some silicone glue on the skewer, and slid the butterfly back up so the glue would hold it.
Then I added glue to the inside edges of each of the wings, since they also didn't want to stick together very well.
Last, I added green Stickles to the butterfly's bodies, and diamond Stickles to the edges of the wings, then mounted him to the fold using silicone glue.
The silicone glue seems to hold really well, and he's in there firmly. It's the kind of glue that you buy in a large tube at the hardware store, and is good for gluing all kinds of things. I used to use it a lot in my dollhouses, and love using it to glue flowers and things on cards. If you've been wondering what to use to stick odd embellishments on with, try it, it dries clear, and really sticks!
Monday, December 17, 2012
Grow with Love Fancy Fold Card


I decided to try making another card using a fold by Thea Wildeman. The first one I made was here.
The background of this card was made using some DP by Anna Griffin that I've had in my stash for a number of years. The three tags are all from two different sets by K&Co. The scalloped borders in the card's window were made with a MS edge punch.
The top photo is of the card closed, and the bottom two are different views of it open.
Thea has made a diagram for this card on her blog. I changed my measurements into inches, and for this card, I used a piece of CS which is 6" x 12".
My card is scored at 4' and 8".
Where Thea has 3cm, I made mine 1".
Where she has 2cm, I have 1.5".
Where she has 3.5cm I have 1.25".
The measurements I used on this card make it look nicer when closed than it looked in my first card.
Sunday, December 16, 2012
Cardinal Ornament Card ODBDSLC134


N= Nestabilities (Ornament was cut and embossed with a circle Nestie) O= ODBD and Ornament E= Embossing L= Layers
I received my Our Daily Bread Designs Cardinal Ornament stamp set a few day ago, and couldn't wait to make a card from it. Since this one also fits the Our Daily Bread Designs Challenge ODBDSLC134 Noel word challenge, I decided to enter it.
I took two photos of it, one shows the detail better, and the other shows the shine from the Gelly Roll pens.
The ornament was stamped with Memento Cottage Ivy, then colored with Copics. Then I used Gelly Roll pens to go over a lot of the details and add shine and dimension to the stamping and a metallic gold pen to go around the edge of the ornament.
The background is K&Co DP matted with gold mirror card and mounted onto a white 5x7 card, then a bow was added. After that, I mounted the ornament dimensionally over the tails of the bow.
Next, I punched a bunch of McGill foliage and cut and embossed a bunch of Marianne Designs Creatables Poinsettias. The veins on the poinsettias were outlined with another Gelly Roll pen. When the light isn't shining on them, they are darker than the poinsettias, but when the light hits them, they shine. Those were stuck down with a combination of Glossy Accents and silicone glue.
After that, I added gold pearls.
Friday, December 14, 2012
Happy Anniversary Easel Card PSX Stamp

I was going through my older stamps, and realized I hadn't used this Happy Anniversary stamp from PSX in years.
I decided to do an easel card, and I wanted it to be warm and romantic looking, so I chose this paper from K&Co, and used VersaMagic Perfect Plumaria to do the stamping and shading.
The tags were made with two Spellbinders dies. I shaded the scalloped one, and used a blending stump to outline the inside of the top one with the Plumaria ink. Then I ran the stamp pad around the outside edges. The blending stump didn't make as sharp an outline as I would have liked, so I went over it with a matching Gelly Roll pen.
The tags are mounted dimensionally on their rectangular backgrounds, and those are mounted dimensionally onto the card.
For the foliage, I used the McGill punch because I wanted the branches to be a little larger than the MS ones. It's nice to have both punches because they are virtually identical except for the size. Sometimes I use both on one project, and at other times I only use one.
The roses are a little brighter than I would have liked, but not as bright as in this photo. They are a deeper red in real life, and the ribbon exactly matches the red paper I used for matting, even though it looks purple in this photo.
I finished the card by adding deep red pearls.
Thursday, December 13, 2012
Filigree Chickadee Card ODBDSLC134

N= Navy, Nestabilities O= ornament E= Embossing L= Layers
I was so inspired by the navy blue colors of the cards made by Chris Olsen and Jan Keen as examples for this challenge that I had to make my own navy and white card for Our Daily Bread Designs Challenge ODBDSLC134 Noel word challenge.
For this card, I used the ODBD Chickadee Ornament set.
The ornament was stamped with Distress Faded Jeans, and embossed with clear embossing powder. At first, I just used the blue ink to shade around the ornament, but then decided to also go around the edge with a metallic silver Gelly Roll pen.
The snowflake around the ornament was made using two Spellbinders Pendants. The corners were made using a Spellbinders limited edition die designed by Becca Feeken, which came with her November Kit Club. All shading was done with the same ink.
The navy paper is mounted onto a mat of silver mirror card, which unfortunately looks black in every photo I took. This is mounted onto a white card. The corners were mounted flat onto the card, and the center snowflake was mounted dimensionally. The ornament was mounted dimensionally on top of the snowflake, and blue and white pearls were added.
Wednesday, December 12, 2012
Turtle Dove Ornament Card ODBDSLC134


I took two photos of this card because I couldn't get a good photo straight on because of the reflection. The sideways one shows a little of the dimension and how the card looks without the reflection.
I hadn't used my ODBD Turtle Dove Ornament stamp yet, so I decided to use it to make a card for this week's Our Daily Bread Designs Challenge ODBDSLC134 Noel word challenge- Use the letters in Noel to create a card.
In My card I used N=Nestabilities (for the ornament and sentiment, O=Ornament and Oval, E=Embossing, L=Layers.
The die I used is a Lea'bilities Die. I cut and embossed it a bunch of times from gold mirror card and layered the die cuts, cutting some of them and using them to fill in until I had a kaleidoscope shape on Core'dinations Pearl CS. Then I cut around the kaleidoscope with scissors and mounted it dimensionally onto another piece of pearl card. Next, I added more pieces from the die cuts and mounted them onto the bottom piece pf pearl CS, pushing the ends under the top layer. That gave the design more dimension.
Next, I stamped the ornament and a sentiment onto pearl CS using VersaMark, embossed them in gold, and cut them out with some Spellbinders dies. I outlined the ornament with a gold pen, then mounted the sentiment dimensionally onto the ornament.
Next, the ornament was mounted dimensionally onto the kaleidoscope, and everything was mounted onto a gold mirror card mat, and the card itself.
I filled in some of the empty spaces by punching tiny gold mirror card flowers and accenting them and the other shapes with Liquid Pearls.
Tuesday, December 11, 2012
Iris and Lace Card

This is the Darice Embossing folder I bought on Sunday. Originally I tried to do the letterpress thing where you brayer ink onto your embossing folder and then emboss it. I had planned on having a powder blue background with white lace, but unfortunately my letterpress things never look the way I envision them. So far, most of mine turn out blotchy and messy looking, so I revised my plan.
This time, I embossed a light aqua card and went over it lightly a couple of times with white ink and a sponge dauber. I wanted the white to contrast more than it did, but wasn't too bad, and I sort of liked the way a bit of the ink smudged onto the background so it wasn't just a solid color.
Then I kept playing with colors to mat the card with until I came up with these colors, which reminded me of some of the iris and hydrangea dimensional stickers I had from K&CO.
After I matted everything, I cut a white rectangle for the center and went around the outside of it with a Brilliance ink pad. Then I tried combinations of the iris and hydrangea stickers until I decided I liked this simple one. I added some fancy paper with glittered swirls from my stash to the rectangle as a background for the iris, cutting it just a hair smaller than the white rectangle. It was quite easy using my newest Fiskars trimmer with the wire thingy to show where your cut line is! Then I mounted the center dimensionally and added the sticker and a bow.
I was trying to decide whether or not to add a lot of flowers and things, or to keep it simple and let the glittery lace background, the embossing and the iris and bow be the stars of the show. In the end, I decided just to add four rhinestone to the corners to mirror the glitter in the center.
Monday, December 10, 2012
Ribbon and Tree Card

I made this card last week and forgot to upload it. For this card, I was playing with my ribbon, and combining them to see how they looked together. I liked this combination, and cut a piece of white CS to the width of the three strips together. Next, I used my ATG to apply them to the card.
I matted that with gold mirror card and added it to a 5x7 card.
Then I went through my Christmas die cuts, and held them on the card until I found the one I liked the best. This one is German Scrap from my stash.
I was going to use one of the Spellbinders tags to add a saying under the tree, but decided I really wanted the tag to match the card better, so I cut a strip of CS and mounted a piece of the green ribbon onto it. The best size die for the width of the ribbon was this small one from a discontinued JustRite Spellbinders set, so I chose the best fitting JustRite Christmas sentiment I had that would fit inside of it. Then I stamped it with VersaMark, and embossed it with gold EP.
After that, I cut the piece of ribbon and CS to the length I wanted it and notched the sides, then mounted everything dimensionally onto my card. Last, I added some gold outline stickers to the green borders.
Sunday, December 9, 2012
Bird ornament Card with Noor! Dies and Creatables

This is my favorite die at the moment, and I wanted to use it again. I made a card using it with the same Marianne Creatables dies a while back and liked the way they went together. I also like the way the Our Daily Bread Designs Bird Ornaments fit in this die. A week or so ago, I made a box in yellow and purple, using another Our Daily Bread Design Stamp, and liked the colors on the box, so I decided to incorporate all of these things into one card.
It actually didn't come out looking as good as I had hoped it would, but it isn't that bad. I'm not sure I like the yellowy gold I shaded the Noor! Die with. It was brighter before, then I tried to tone it down with a duller shade, and it kind of smudged. Oh well, some times thing work better than we expect, and sometimes they don't. :-)
The papers are white Core'dinations Pearl, and a pearlized purple CS from my stash. The outside two layers are Marianne Creatables, the next layer is from Noor!, the scalloped circle is another Creatable, and the bird layer is cut with a Spellbinders die.
The ornament is stamped with VersaMark and gold embossed, and everything is outlined with a gold pen.
The birds are actually supposed to be chickadees, but since I wanted yellow and purple, I decided to turn them into spring warblers. I love warblers, and I found out when trying to identify some of them that there are named varieties, and others that are called hybrids, and don't really have a name. Apparently warblers don't always choose the same kind of warbler for their mate, and their off spring are what is known as hybrids. So I figured it was okay to consider this a hybrid warbler, since it probably doesn't look like any named variety! :-D
I didn't have the shade of yellow I wanted for the birds in my Copic collection, so I used Staedtler Mars Graphic pens for all the coloring except the green. The green is a Copic marker.
The two center circles are both mounted dimensionally, and the pearls are actually purple, although it's difficult to see the color in the photo.
I made this card yesterday. Today, we went off the island so I could do some Christmas shopping. One of the things it is difficult to get anywhere here, is refills for my ATG, and I'm almost out of tape. I always try at AC Moore and Joann's, but they never have them.
I ran into AC Moore again today, but of course they still don't have them. AC Moore is much worse than last time I was there. The scrapbooking shelves are getting pretty empty.
The girl who used to manage it and tried so hard to get the things we needed apparently got fed up and left a few weeks ago. A new manager came in and got fed up and left after only a few days. Apparently there hasn't been anyone ordering for a couple of weeks there. You'd think that AC Moore would let their managers order what the customers want instead of always telling them that Bangor, Maine is out of district for all the good stuff. I didn't even bother to try Joann's, because that seems to be as bad as AC Moore.
Anyway, there was another Fiskars trimmer on sale for a good price, and the markings are easier to see than the one I bought a couple of weeks ago, so I bought it. This one doesn't have any metric markings on it, but at least I can see the lines more easily, and it has a wire thingy to make it easier to see where you are actually going to be cutting, instead of a slot. I have seen people using Fiskars trimmers to score with, but so far none of the four I have do that. I have no idea which ones have a scoring tool, because I can't find any that do. I do like my last trimmer, it actually cuts straight lines, and makes it easy to cut thin strips. My big paper cutter doesn't cut anything thinner than around two inches. After that, the numbers are under the thing that holds the paper down.
They also had a few Sizzix and Spellbinders dies left. I've wanted to try the Bitty Blossoms for a while, but that is one of the many they never had in our area. They did have Bauble blossoms One and Two on clearance, so I bought them both. It will be fun to see what kind of flowers I can make with those!
I also found a lacy Darice Embossing Folder and bought that. Everything was on clearance, so I left with a paper trimmer, two Spellbinders and an Embossing Folder for under $30! Gosh, I remember the old days, when it was almost impossible to get out of AC Moore for under $100. I miss those days. Now they are getting so bad I have a hard time spending $50 in there.
Saturday, December 8, 2012
White Embossed Christmas

I always like all white Christmas cards, so I decided to make one with touches of gold.
I started by embossing this Sizzix EF and trimming around it. Then I matted it with two more layers of white, each cut 1/8" larger, rather than the 1/4" I usually use.
I cut another sheet of white 1/4" larger, and matted that with a sheet 1/8" larger, then cut a card 1/4" larger and mounted the two new plain sheets on that. Then I mounted the first three layers I dimensionally onto the three bottom sheets.
The layers look flat in the photo, but the added dimension with the top three layers floating above the bottom three look nice in real life.
Also, all layers are the same shade of white, but it's so dark here that even by using white balance, some of the layers look like cream because of the lights.
The JustRite ornament was stamped with Versamark, then embossed with gold and mounted dimensionally onto the embossed layer. I finished by making a Marrianne Creatables poinsettia out of white CS and Gold Mirror card, and added that to the bottom, then added crystal snowflakes and a white and gold bow.
Friday, December 7, 2012
Pink Flowers and Butterfly Card


I took two photos of this card, one without the flash, and one with it. The one without the flash shows how well the butterfly matches, but is blurry and flat looking, and the one with the flash shows some of the shine on the card, but the butterfly is in the shadows.
For this card, I used a Marianne Creatables die. All the DP and paper embellishments are K&Co, the white paper is Core'dinations Pearl, the ribbon is Offray, the gold is three different pens, the shading is Brilliance Perfect Plumaria and the pearls are Liquid Pearls.
All the layers are outlined with a gold pen, and all the die cuts are mounted dimensionally.
I wish I had outlined the flower and butterfly with gold, but didn't decide that until after they were mounted onto the card. I'm also not happy with the white between the flower stems. It would be very difficult to fussy cut them because of the way the dimensional sticker was made, but I may add a bit of pink shading to match the background.
Thursday, December 6, 2012
Noor! and Spellbinders Lacy Card

I decided to try making a card from this Noor! die without mounting it. Both the back and the front were cut together, leaving a bit at the top to use for the fold.
The center was made with Spellbinders Renaissance Hearts Pendant. All layers were mounted dimensionally, and the shading was done with Brilliance Sky Blue, and Brilliance Platinum.
The dies were outlined with a metallic gold pen, which is very pretty in person, but the metallic of the pen, and the pearl sheen on the inks don't show up in the photo.
The pearls are Liquid Pearls.
Wow, I am so excited!!! Cardinals are very rare where I live, but I've had a pair of them for about a year. This morning I looked out the window and I had two pairs I couldn't believe it. Just now, I looked out, and there were THREE males chasing each other around. Most people here on the island have never even seen one cardinal in their feeders! I expect some are babies of the pair I've had, and that is why there are so many in my feeders, I love seeing them. I'm so glad I bought Wild Delight bird seed, because they sure do love it!
Tuesday, December 4, 2012
Chickadee Ornament Card ODBDSLC133 Sketch

I made this card for Our Daily Bread Designs Challenge ODBDSLC133 Sketch.
A list of what I used to make the card is below the post.
For this card, I stamped the Chickadee Ornament onto pearl paper using VersaMark, and embossed it in gold. Then I used the sky blue ink to color the center of the ornament. Next, I colored the birds with Copics. It's kind of hard to see the detail in the photo because of the shine from the embossing powder and pearl paper.
The ornament and larger blue mat were cut with Spellbinders circles, and the gold mirror card between the two layers was cut with a Spellbinders scalloped circle die. These were outlined with a gold pen and mounted dimensionally onto the doily background.
The doily was cut from pearl paper with a Noor! Die, and shaded with Galaxy Gold. In person, it is metallic and matches the other golds, but the photo makes it look yellow. I love this gold in person, my old metallic golds looked like metallic brown, but this one is really pretty. I just wish it photographed better.
I embossed the blue layer behind the doily, and fussy cut it to mount behind the doily. This was mounted dimensionally onto the card when the card was finished.
The card is made by layering some pearl paper which was run through an embossing folder onto gold mirror card, more of the gemstones, and onto a base of pearl.
The wide ribbon was sheer white with metallic edges and gold sparkles. I cut a piece of the gemstones paper the width of the ribbon to make the ribbon match the card, mounted the ribbon on the paper, and trimmed the end to match the sketch. Then I mounted that onto the embossed background and folded the flat end onto the back. Next, I added a narrow gold ribbon vertically and assembled the card.
This card is 7 1/4" square, so the embossing folder had to be used more than once to cover the background, and I had to make the card using two pieces of the pearl paper attached to each other to get the 14 1/2" length it required.
It's fairly easy to do that, you just cut one 7 1/4" square. and one that is 7 1/4 x 7 3/4", and score a half inch fold on the larger piece. Then you put the two together, gluing the half inch fold on the backside of the square card. That way, the join is behind the card and no one ever sees it.
Stamps: Our Daily Bread Designs Chickadee Ornament
Ink: VersaMark, Brilliance Galaxy Gold, Brilliance Sky Blue
Paper: Core'dinations Pearl, Core'dinations Gemstones, Gold Mirror Card
Dies: Spellbinders, Noor!
Embossing Folder: Darice
Other Items: Ribbon, Copics, Gold Embossing Powder, Metallic Gold Pen
Saturday, December 1, 2012
Painted Box with Another ODBD Stamp


First, I wanted to say I'm sorry I haven't been around to your blogs for a few days, but it's been quite busy here. Hopefully I can start catching up in a few more days.
This is the second box I've done using stamps from Our Daily Bread Designs. For this one, I used the bird from their Sing to the Lord set.
The box is actually prettier in person than it is on here. I had originally planned on painting the bird as a scarlet tanager, but now that I have two of these boxes, I've decided I want to get the Cardinal and Chickadee sets from ODBD for the other two matching boxes I have, and the cardinal will be red, so I painted him as a bluebird instead.
Thursday, November 29, 2012
Another Painted Box using an ODBD Stamp


Lately I've been having fun using my stamps to stamp on wooden boxes, and then painting them. I love this box, which I've had for years, and was glad to see that the bird and thistle from the Our Daily Bread Designs He Watches Me Set fits perfectly on the top of it. I was so worried about getting the bird centered that I forgot that he should probably be angled a little more diagonally though.
The bird is actually supposed to be a sparrow, but with this dark wintery weather, I decided to make a cheerful little goldfinch instead.
Wednesday, November 28, 2012
PSX Stamps Lighthouse Boxes
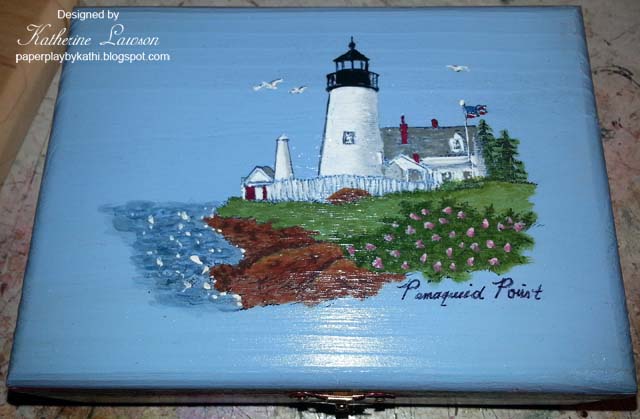
I made this box using one of my old PSX stamps to match the one I made last summer. The one I made last summer is shown below. The two boxes are identical except for the stamps. Last summer I did Portland Head, and I used Pemaquid Point Light on the new one.
I hope I can find boxes this size when I get out to NY to visit the kids for Christmas, because we can no longer get them here. I have a few more Maine Lighthouse stamps that I want to use, and these were the perfect size for them.
I love using stamps as painting patterns, they have so much detail!

Tuesday, November 27, 2012
Our Friendship Card JRC_086

I made this card for the JustRite Papercraft Challenge #086 - Proud As A Peacock. For this challenge, we were to use peacock colors in our creations.
I decided to use my newest JustRite stamp set Vintage Oval Labels. I stamped them with VersaMark, and embossed them in gold. Then I colored them with Gelly Roll pens in shades of blue, green, violet and yellow. They were stamped onto Core'dinations Pearl paper. I love the metallic and sparkly look of the Gelly Roll pens on this paper.
I shaded the centers of the labels with violet Brilliance Ink, and cut them out with scissors. (There are matching Spellbinders dies for these labels, but I don't have them). Then, I outlined them with a gold pen, and mounted them onto pearlescent violet paper from my stash. I cut out around the label, and outlined that with gold as well.
The papers I used are DCWV Mariposa Stack, Core'dinations Pearl in white, and Gemstones in blue, more of the pearlescent violet paper, and Gold Mirror Card separating each layer from the next.
The white daisies are from Recollections, and the blue ones are some I made by layering various flower parts. The stamens were colored with a gold pen, and I added gold pearls to three of the corners. Both of the labels were mounted dimensionally.
Monday, November 26, 2012
Peacock Tiles


I haven't gotten a card done for a few days because I've been working on making some digital files to put on Etsy. My latest tiles are these peacock ones I made from some of my peacock photos I took last year.
I also did a show over the weekend, but unfortunately, the economy is still bad, and nobody did much. It was fun seeing everyone again though. I used to sell between $500 and $700, last year, I sold a little over $300, and this year it was $126, and the cost of the table had to come out of that. I probably should feel good about it, a lot of the venders didn't get the money for their tables back this year.
There were a lot more people with tables than we've ever had, and a lot of people came, but this year they weren't walking around with shopping bags full of things like they used to.
I had other things besides cards, but almost everything I sold this year were my cards. It was the same way in the gift shop all summer, and in most of the other gift shops in town. People were only buying things they knew they would need, not gifts and Christmas decorations or other things that people cut back on. I hope the economy improves next year.
Thursday, November 22, 2012
Lighthouse Christmas ODBDSLC131

I made this card for Our Daily Bread Designs Winter Holiday Challenge.
Since I live on an island, and we have several lighthouses here, I wanted to make a Christmas card with a lighthouse, so I decided to use ODBD's Keep My Lamp Burning Set. This morning, I saw this card by Thea Wildeman and decided to try this fold for the card.
I cut the card with green CS, and made the panels with white. I embossed them with the Cuttlebug Dotted Swiss EF to simulate snow, then mounted them onto the card.
All the stamping was done with Memento Cottage Ivy. I cut around the lighthouse, and made a wreath around the compass with green EP accented with red for a bow and berries, then mounted it dimensionally on the large panel.
The rear sentiment is from the same set, and the front sentiment is from ODBD's Blessed Christmas Set. They were also mounted dimensionally, as was the tree, which was made with a Marianne Creatables die.
I made a poinsettia from another Marianne Creatables die, and used it in one corner, with greenery from the MS Branch Punch.
Last, I added some red pearls and more branches to the corners.
For all the people who have asked for a pattern for this one, It's been quite busy for me for a few weeks. When I made this card, I was experimenting. When I fold this card, it isn't quite right. I need to make the vertical sides a bit wider so the back of the inside box doesn't show. I need to figure out new measurements. When things slow down a bit, maybe even in a few days, I will try to figure it out and make a diagram for you. :-)
Update: I just went back to Thea's Page, and I see that she has added a diagram for the original card she made. I apparently made my card in the same way as she did hers, only I used inches. It looks like hers will do the same thing as mine, since her sides are also narrower like mine are. Mine is 6x12 inches, with the top and side measurements as 1" each, and the folds in the inserts are 1 1/2" each. It's the extra half inch that makes this card look a little strange when folded.
Anyway, since this is actually her card, it would be nice if you used her diagram even if you use my measurements, and leave her a little love on her blog.
I will still try to figure out measurements so this card won't look strange when folded as soon as I get a chance.
Wednesday, November 21, 2012
Hanging Ornament Card

I didn't get a chance to make a card today, so I'm uploading an old one I never uploaded before.
This one uses an older JustRite Original Christmas stamp cut with one of the Spellbinders Ornaments dies. I used Dresden paper trim colored with Copics, and a gold pen around the edges. The stamp is embossed with gold EP. The ornament is hanging from a piece of gold thread and swings freely on the card.
The paper is Core'dinations Pearls, K&CO, and gold mirror card. I added gold outline stickers, gold pearls, and a gold bow to finish it. It was another fast and simple card I made a while back.
Tuesday, November 20, 2012
Wooden Sled Ornament with PSX Santa Stamp

I actually made a card today, but it didn't turn out the way I expected it to. I made one of those star shaped ornament cards with the five squares that you use the origami squash fold on, then glue together, and when you hang it, it's supposed to look like a star. It was all lacy and die cut, stamped and embossed, and it took hours to do, but when you open mine, it looks like a wheel or something. It's round, but flat on the outside edges. Not at all like a star. Part of why it took hours wasn't only because of all the work I put into each piece, but also because I spent hours trying to find one on the internet so I could see what I did wrong. Since I don't know what they are really called, it was difficult to find them. Anyway, when I finally found some, they were made exactly like mine, but the ones on the internet look like stars, not wheels with flat sides. :-(
I guess I will have to do some more research and try to figure it out.
Anyway, every year my mother and I take some of our things to a Christmas benefit show, so when I'm not making cards for it, I'm doing other crafts. The show is this Saturday. One of the things I made is this wooden sled from AC Moore.
I base coated it with white and antique gold paint, then added a few coats of metallic gold and some sparkly white from Martha Stewart. After that, I stamped this santa from an old PSX stamp with versamark, then embossed it with gold EP. I drew a line around the top to frame it with a gold pen, and put a few coats of varnish on it.
It's quite pretty in person, much prettier than the paper wheel I made today!
Monday, November 19, 2012
Christmas Tree Card using Noor! Dies and Creatables

I made this card from the measurements of this card on the Noor! Designs blog.
For the panels on my card, I chose two kinds of ribbon which were the right size for the folds, and cut separate strips of paper the same width as the ribbon, and a little shorter than the card. Then I applied the ribbon to the strips and mounted them onto the card.
Next, I cut out the Noor! dies, and shaded them with metallic gold ink. I mounted them dimensionally onto the card, and cut a red Christmas tree with one of my Marianne Creatables dies. I still haven't found a shade of red paper I really like, and had none to match the red ribbon, so I colored the die cut tree using Copics, and used a gold metallic pen to add the ornaments with.
To decorate the die cuts, I punched some tiny flowers out of gold mirror card. They look more like scalloped circles, which is what I wanted, rather than flowers. Then I added deep red pearls to them, as well as adding some to the die cuts without the punched flowers behind them.
I like the card while it is open, but next time, I will make the folds next to the center narrower, and the outside folds wider. It looks a little strange when folded, as only the center shows, with the rest hidden behind it.
Sunday, November 18, 2012
Got a few new things today
Today we went Christmas shopping. I mostly bought for my mother, and she had me pick out some things for her to get for me.
We went to Joann's and AC Moore. I was very disappointed in both stores. AC Moore is getting more and more like Walmart in terms of scrapbooking quality. I miss being able to buy Spellbinders, and they have now discontinued the Cuttlebug stuff as well.
JoAnn's has also discontinued the Spellbinders, and only had a few old ones left. I did manage to get the small oval and circle sets. I was really glad, since I only had the large ones, and those never seemed to be the right size for a lot of the stamps I had, but I am still really disappointed. Now there is no place around that sells Spellbinders. I also was desperately in need of more tape for my ATG, and neither place has that any more. I was almost completely out of Superfine Detail Gold, and neither place carries anything but large kits of embossing powder, and I have no idea what the quality of those is, but I don't want to spend big money on a big kit of colors I don't need, only to find out that the one vial of gold isn't as fine as I need.
I did manage to get a Memento Tuxedo Black stamp pad. I think that is the one that works the best with Copics.
They also had a Fiskers cutting thing on sale, so I got that too, hoping it will work so I can make the center step cards more easily. It doesn't have the scoring tool, and neither place had one of those, but I have the MS scoring board, so it doesn't matter that much. The Fiskers thing is plastic, and my other 12" one was metal, and much sturdier, but that one had a defective part where you slide the blade down, so maybe sturdiness and metal instead of plastic doesn't mean it was better.
With these chain stores discontinuing so many of the good products we use, it makes me wonder if they even want to carry scrapbooking supplies any more. They both have fewer aisles, and so many fewer products now. There are hardly any flowers like the Prima ones left either. None at Joann's, and only a few leftovers at AC Moore. Are Michael's and Hobby Lobby carrying fewer supplies as well? I only get to those places when we are In NY visiting the kids. If they have cut back too, I will be so disappointed.
I suppose it's good for the LSS, but we don't have any of those, so I guess it will be mail order for me from now on. It used to be so much fun to go to the craft stores, now it's difficult even to find enough to use the coupons for.
I did get another three drawer cube thing for storage at AC Moore with my coupon from there, but there was nothing to use the coupon for at Joann's.
I'm trying not to remember what my mother got for me for my birthday and Christmas, but it was mostly paper stacks, a new VersMark pad, (mine is pretty worn out), a set of Brilliance pads, and some ribbon. No new and beautiful Spellbinders dies or embossing folders.
Saturday, November 17, 2012
Die Cut Filligree Card

I've always loved the cards made by Elly de Bruin. She is probably the queen of using die cuts. Today on the Noor! blog, they had instructions for making one of her cards. Although my card is nothing like the one on the Noor! site, it did inspire me to try making my own "Elly style" card.
I started by choosing this Spellbinders die for the main panel, and kept layering other dies on top until I found a design I was pleased with. Then I cut everything out using white CS and shaded them all with green. Some layers are dimensional, and some are mounted straight onto the layer below. Then I added some pearls.
The dies are from Spellbinders, Noor!, and Marianne Creatables. The white is actually all the same shade, but the white in the center motif looks brighter because of the camera's flash.
Friday, November 16, 2012
Center Step Card with Noor! Dies and Creatables


This is only the second center step card I've ever made. I know it's pretty easy if you have a Fiskers cutter that works, but unfortunately, the first one I bought was smaller and didn't cut very straight. Everything was a little wider at one end than the other. Then I bought a larger one, and the cutting thing doesn't move smoothly in the track. It has always stuck in places, and doesn't cut evenly because of this. The track has defects in it, and since I've had it for quite a few years, I can't return it. Anyway, way back when I bought those two cutters, I got fed up and purchased a more expensive one from a different company at Staples. This one works well, but it has a wheel, and you can't use it to start and stop precisely in the spot you want it to like you can with the Fiskers ones, so making these cards is kind of a pain.
I made this card as a 5x7 card, with 1 1/2" sides, and a 4" square center.
I took two photos of this because with the phone's flash, it doesn't show the shiny gold, and with just the lamp shining on it and no flash, the colors aren't great.
The die cuts on the sides and in the center are Noor!, and the one behind the tag is a Spellbinders Fancy Tags One. The trim on the bottom is Dresden paper, and the large flower motif is K&Co. The tag is from my stash, and the poinsettias on the sides are Marianne Creatables.
I also added green rhinestones and gold Liquid Pearls.
Thursday, November 15, 2012
Another Red and White Christmas

I haven't had much time for making cards this week, so I'm uploading another one I did over two years ago, when I got my first Marianne Designs products, and before I had a blog.
This one was done with a Designables embossing folder, and a bunch of Creatables. I gave the card away long ago, so I don't have a clue what I used for paper.
It may be my own design, or it may be one I cased, I'm not sure. Anyway, if it is one I cased and someone recognizes it, please let me know and I will give credit. I barely remember making it, but I know it is mine, not only because of the folder on my computer it was in, but also because of the background which I cropped out.
Wednesday, November 14, 2012
Red and White Lea'bilities Holly Card

I didn't get a chance to make a card today, so I am posting one I made a while back and never put on my blog.
This is similar to one I made about a month ago which was in two shades of green.
This card was made with a holly die set by Leane Creatief BV. The flowers in the corners were made with small punches, and the poinsettia is made with dies from Marianne Creatables.
I accented the card with silver Stickles, but the silver glitter didn't photograph very well, which is why I didn't put this on my blog when I first made it.
I cut the Lea'bility die using wax paper since it is a very fine die. I would expect it would be difficult to remove it without tearing it otherwise.
Tuesday, November 13, 2012
Gold Poinsettia and Ribbon Card ODBDSLC130


I made this card for Our Daily Bread Designs Challenge ODBDSLC130 Gold or Silver.
For this card, I used Core'dinations Pearl CS and Gold Mirror Card. The Poinsettia is from ODBD's Blessed Christmas Set, and cut with their matching Poinsettia Custom Die. It is stamped using Versamark, and embossed with gold EP.
I had a roll of this Christmas Ribbon, which had a very sheer pale gold center with sparkly gold snowflakes, and gold borders. I decided to cut a piece of the gold mirror card a little wider than the ribbon and mount it onto that. In person, it looks like the gold under the ribbon is brushed gold, with gold mirror borders. If the sun comes out tomorrow, I'll try to get a photograph of it without a flash so you can see the effect. In this photograph, you can see the shine through the ribbon because of the way I photographed it. (I tried photographing it again, but it didn't come out great. Also, you can seewhere I ran my ATG to hold the ribbon down in the photo, but in person, you can't see it through the ribbon).
The poinsettia is mounted dimensionally onto the ribbon. The background paper was embossed using a Spellbinders M-Bossibility on just the edges, leaving a small strip between it and the gold paper, then I drew a gold line along the embossed edge with a pen, and mounted a saying, a bow, and some pearls.
Monday, November 12, 2012
Another Glittery Christmas Card


For this card, I used some of the ribbon and another color of the glittery gift wrap I bought yesterday. I took lots of photos of this card, trying to get one that really shows what the card looks like, but it was really difficult to photograph all that glitter. The aqua glitter paper is lighter and prettier than it looks here. It is a bit lighter than the ribbon.
Besides the glittery paper, I used silver mirror card and Core'dination white pearl CS. The ornament was stamped using VersaMark and silver tinsel EP. The stamp is from JustRite's Noel Christmas Ornaments set.
Instead of using the matching Spellbinders die for the ornament, I cut around it with scissors because I didn't want a border. The central motif is mounted dimensionally.
I added silver outline stickers from my stash in the corners, and white pearls and aqua rhinestones.
Subscribe to:
Posts (Atom)