Pazzles Bar

Get the Pazzles Inspiration, the most comprehensive electronic die cutter available, for as little as 99 dollars down.

Saturday, January 25, 2014

Altered Cigar Box with Compartments


I decided I wanted to make this cigar box with a nautical theme, so I used some JustRite stamps on some pale gold Core'dinations Pearl CS and gold embossing powder. I shaded the edges with gold ink, then cut some gold mirror card with some Spellbinders dies.

When I went to do the inside, it looked too fancy to cover up the design. The label was quite interesting, and it had raised sides which were covered with silk like red cloth.


It's difficult to think of different ways to finish the insides of the boxes, so for this one, I decided to make four compartments out of bass wood, and make red painted covers for each section. Red ribbon was used to attach the compartments and act as hinges.


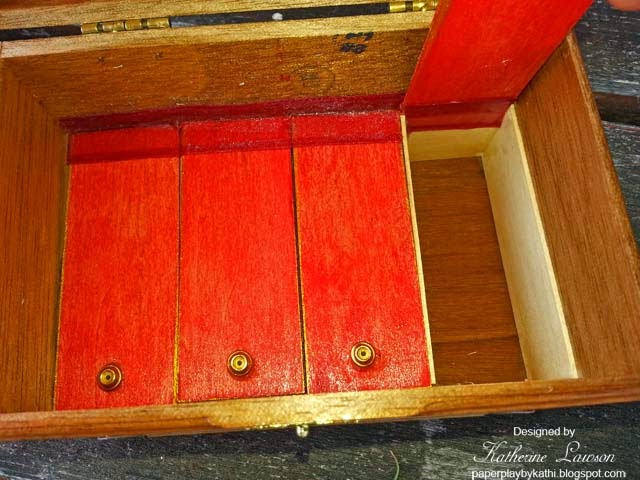
Each cover has a little knob made from jewelry findings to lift them up. I think this one would work well for a man.

Saturday, January 11, 2014

Pink and White Majestic Labels Card


I'm giving you a break from Christmas cards, and posting another of the Spellbinders cards I made last fall. This one is made from Majestic Labels Twenty Five.

All the dies were cut on white CS and shaded with a Brilliance pink color, and it was matted with pink and white CS. After I finished the card, it needed something, so I added a flower I had made with a punch to the center, and some Liquid Pearls.

I love these dies, they make it so easy to make a beautiful and intricate looking card!

This one also reminds me of my blog friend Jill, because she likes pink.

Myrna, Antoinette, and Marie-Louise, I will be making plenty more blue cards! Thanks to all of you for being such faithful followers!

Friday, January 10, 2014

Creatables Wooden Christmas Box


Sorry about more Christmas things in January, but I'm still catching up on posting projects I finished last fall.

This is another altered cigar box. This one had a sliding top, so my husband drilled a hole in the top, and I added a little knob so it would be easier to open. The knob and the edges of the box were shaded with Viva Decor Inca Gold, then I applied some wood veneer to all the sides. The Marianne Creatables were cut and embossed from a lighter veneer, and shaded while still in the die with the Inca Gold, then the whole thing was varnished.

I made it while the shop was still open, and a lady paid me for it while I was still working on it. She wanted it for her husband for Christmas. I love it when that happens!

Thursday, January 9, 2014

PSX Midnight Christmas Card


This card reminds me of those Christmas services we used to go to on Christmas eve when I was a child. Those services were magical!

The card was done with an old PSX stamp, some dark blue CS, watercolors I made from PearlEx, silver EP, silver mirror card, and several Spellbinders dies. I photographed it two ways, one to show the depth, and one to show the shimmer.

I really liked this card on the diagonal, but it posed two problems. One was how to make it so it opens right, and the other is that it won't stand up without an easel. I solved the opening issue by making a blank rectangular card the same size as the church image part and attaching it behind the card, but it still needs an easel. I suppose I really should invest in some easel dies. :-)

Tuesday, January 7, 2014

Warm Wishes Winter Card


I love the Anna Griffin embossing folders, and decided to try making an embossed winter card using them for the background. The sentiment is a Sizzix folder I have had for years. This was a very quick and easy card to make, because it didn't need much embellishment because of all the texture.

I embossed light blue CS, and used my square foam shading thingies to go over the embossing with white ink to make it look frosty. Everything is matted with Core'dinations Pearls CS in white, and mounted dimensionally.

I added a bow I made just before adding the sentiment.

Monday, January 6, 2014

Pink and Gold Altered Cigar Box


I bought this embossed paper at an art supply store a while ago, and last summer I decided to do an altered cigar box with it. The paper was shaded with Delicata Golden Glitz, and outlined with a metallic gold pen, after trimming to size, or cutting with Spellbinders. All the paper was matted with white CS, which was also outlined in gold.

The outside was decorated with flowers, butterflies and Liquid Pearls.

On the inside, I cut some dividers out of basswood and painted them with pink acrylic paint. The latches on the front have pink Liquid Pearls on them, to make them match the box better.


Saturday, January 4, 2014

Blue Sparkly Shell Card


Here is a card I made with the embossed shell I posted yesterday. The glitter was coming off as I was making it, so I tried spraying the embossed design with Krylon. It worked so well on this shimmery blue art paper that I tried spraying the irises I made as well. The Krylon didn't react well with DCWV shimmery paper, and removed the shimmer on the iris one. It also removed some of the lilac color, so if you try krylon, spray a test swatch first.

The shell layer is matted with Cordinations Pearls, and since I seem to get so many of those expensive gold and silver pens which are old and don't work, I tried a Sharpie Metallic Silver pen to outline the white. The Sharpie isn't as shiny as the expensive pens, but at least it worked.

The next layer is DCWV Glitzy Glitter paper, and is also matted with the Pearl CS, then mounted on a pearl card. Both matted layers were mounted dimensionally.

I took two photos, one shows the colors and dimensions better, and the other shows the shimmer and sparkle.

Well, I have to go see to my mother now, I'll try to do some visiting tonight.

Friday, January 3, 2014

Embossing Paste, Glitter and Stencils


I have wanted to try embossing paste on a card for a long time, and got inspired by this tutorial by Shaz Brooks.

For my examples, I used some old Anna Griffin stencils I have in my stash. I cut the pearlescent blue and lilac papers to the same size as the stencils because I was afraid I might mess them up if I cut them after they dried.

I did everything else the way Shaz explained it, except I couldn't find my pallette knives, so I used a plastic knife. I loved her idea of using baby wipes on the stencils, and I did that as well.

The only kind of paste I could find in my area was Liquitex Flexible Modeling Paste, and it seemed to work well. After I removed the stencil, I sprinkled on some ultrafine glitter that I had in an old spice bottle. The glitter was from some painted ceramic kits I had bought years ago. I had never used it, and had put it into the bottle for later use.

The plastic knife gave me a bit of a corrugated cardboard type look because of the serrated edges of the knife, but it wasn't too bad. The designs are much sharper in person than in the photos because it has been freezing, snowy and dark here, so I can't get a good photo. I was very pleased about how fine the detail came out, except for a few of the little flowers in the top of the iris one, where I managed to smudge it a bit. There really is a lot more fine detail in person.

Anyway, since I did them last night, they are now dry, and now I get to make cards with them!

Thursday, January 2, 2014

Air Dry Clay and Wilton Molds Shell Card


I hope you all had a wonderful Christmas, and hope you have the best year ever!

I haven't posted much this month because it's been very busy, both helping my mother out, ice storms, snow storms, power outages, and a trip to New York to see the kids and grandchildren.

I made this card earlier in the month using Wilton Silicone molds made for cakes with my Martha Stewart air dry clay.

The card base is ivory CS, with some golden colored, textured, handmade paper which resembles sand, but has a sheen to it. The shells were shaded with gold ink, and a label was made using the same paper, and some cream colored handmade paper which was stamped with the same gold ink, using a sentiment from JustRite.