This is where I put my cards, and other paper crafts. I hope my blog inspires you to create too!
Saturday, December 1, 2012
Painted Box with Another ODBD Stamp
First, I wanted to say I'm sorry I haven't been around to your blogs for a few days, but it's been quite busy here. Hopefully I can start catching up in a few more days.
This is the second box I've done using stamps from Our Daily Bread Designs. For this one, I used the bird from their Sing to the Lord set.
The box is actually prettier in person than it is on here. I had originally planned on painting the bird as a scarlet tanager, but now that I have two of these boxes, I've decided I want to get the Cardinal and Chickadee sets from ODBD for the other two matching boxes I have, and the cardinal will be red, so I painted him as a bluebird instead.
Thursday, November 29, 2012
Another Painted Box using an ODBD Stamp
Lately I've been having fun using my stamps to stamp on wooden boxes, and then painting them. I love this box, which I've had for years, and was glad to see that the bird and thistle from the Our Daily Bread Designs He Watches Me Set fits perfectly on the top of it. I was so worried about getting the bird centered that I forgot that he should probably be angled a little more diagonally though.
The bird is actually supposed to be a sparrow, but with this dark wintery weather, I decided to make a cheerful little goldfinch instead.
Wednesday, November 28, 2012
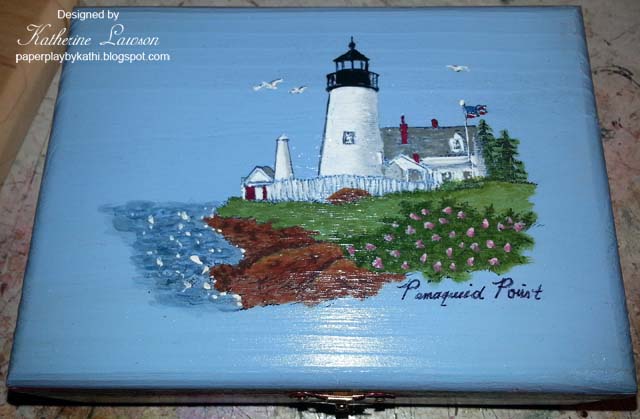
PSX Stamps Lighthouse Boxes
I made this box using one of my old PSX stamps to match the one I made last summer. The one I made last summer is shown below. The two boxes are identical except for the stamps. Last summer I did Portland Head, and I used Pemaquid Point Light on the new one.
I hope I can find boxes this size when I get out to NY to visit the kids for Christmas, because we can no longer get them here. I have a few more Maine Lighthouse stamps that I want to use, and these were the perfect size for them.
I love using stamps as painting patterns, they have so much detail!
Thursday, June 21, 2012
Another Wooden Box with JustRite Stamps
Monday, June 18, 2012
Ship Box with JustRite Stamp

I haven't got a card finished today because I finished this box for my shop today.
I stamped JustRite's Anchors Away onto wood veneer and die cut it in my Grand Calibur with JustRite's Nested Medallion Labels Dies, then painted it with craft acrylics. Unfortunately, the paint was drying too fast even though I used a retarder, and it's not as smooth as I would have liked. It looks smoother in person. I was also having trouble shading the rope because it was drying so fast and it looks a bit messy in the photo. Then I mounted the veneer onto a wooden box and put a few coats of varnish on it.
I'd rather be making cards, but customers like my boxes too, so sometimes I have to make other things.
Friday, June 1, 2012
PSX Portland Head Light Stamped and Painted
I used Stazon to stamp it because I knew the paint and varnish wouldn't affect the Stazon. The box wasn't rough, and I sanded it, but the label in the bottom corner didn't quite cover. I decided to leave it as it is because I was afraid I would mess it up if I tried to fix it.
Everything in the gift shop my mother and I run is made by us, so sometimes I have to do something besides a card, and I thought this came out rather nice. I just have to varnish it and clean up the latch a bit and it will be done.
Thursday, May 24, 2012
Shell Box
I didn't get a card made today, but I made this box for my gift shop.
To make it, I sanded an unfinished box, and painted it brown. Then I traced around a JustRite By the Sea oval stamp and painted the oval a cream color. After that, I stamped the shell image on the stamp with a dark Brown Anna Griffin stamp.
Next, I used the border from the stamp and stamped it outside the oval using Memory Box Frost. Big mistake. I'll tell you why when I get to that part. :-P
Well, it seem that neither of these inks dry on top of acrylic paint, so I had to dry them with a heat gun.
Once dry, I painted them with acrylic paint and a gel medium so they would be more blended and translucent. Then I painted over the oval's border with cream paint, and added little swirly things around the box with the same cream.
Next, I began to varnish the box with acrylic varnish. That's when disaster struck. The frost ink around the oval didn't like my varnish and smeared all over the darker brown paint. Anyway, since it was only on the dark brown, and the brown ink on the stamp in the middle didn't smear, I decided I could save it. In order to have it all match without redoing the box, I had to varnish the whole top. I varnished from the inside out so the white would only smear outside the oval, then I let it dry and put a couple of coats of the dark brown paint around the oval to cover up the stamping and smears. Since I hadn't really liked the stamped border anyway, (it looked a bit heavy for the design after I painted it), I just added little swirls to match the ones on the outside of the box. After this I added more varnish to the outside of the box, and everything worked out fine.