Pazzles Bar

Get the Pazzles Inspiration, the most comprehensive electronic die cutter available, for as little as 99 dollars down.

Monday, March 26, 2012

I made a third album

This album was made mostly with the Mariposa Stack by DCWV. It's one of my favorites. I also like that the CS is printed on only one side, since I always mount everything to make the CS thicker and more sturdy. I have also used a bit of paper and embellishments from Anna Griffin, Graphic 45, and K & Co in this Album.

Each page is mounted on a 6x9 envelope, and extra photos or souvenirs can be slipped into the envelopes. Almost everything is also outlined in gold. I started out with a Krylon pen, then that ran out, and I ended up using two Pen Touch pens. Both of those ran out as well. I don't think I will try outlining a whole album in gold again!

I also used a lot of Stickles throughout the album.


This is the front of the album. I die cut another piece from the same sheet with my Spellbinders and mounted it with dimensional tape. The butterflies are from K&Co and Anna Griffin.


The next pages both have places which flip up for more photos. The back of the cover also has a flap which opens to access the inside of the envelope.

The opposite page has a tag and a mini album which opens to reveal two places for journaling or photos.


The next set of pages each has a booklet. The page on the right also flips up.

The small album has a sewn border and has 16 pages. The larger one has three pages.


Here is the next set of pages. The flip up section on the left has three tags for journaling and photos behind it.

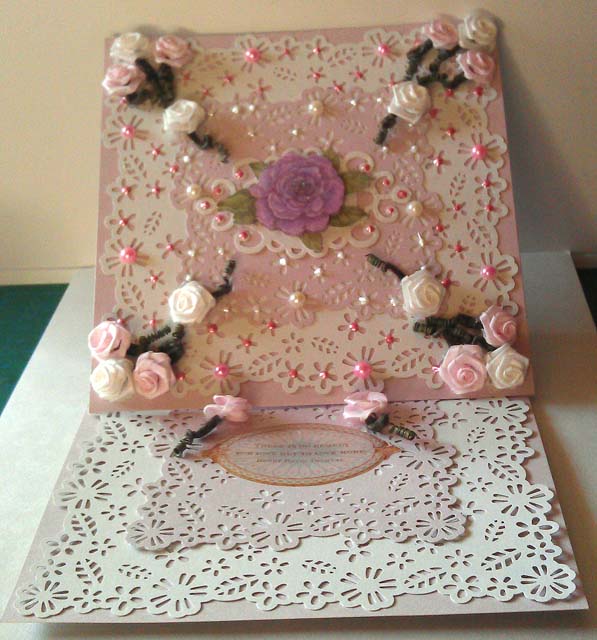
The one on the right is gatefold. When you open the doors using the pearl doorknobs, there is space for more photos and journaling. This page has ribbon outlines.


Since the next two pages are rather complicated, I am showing them in two separate sections of photographs.

This page flips up, and then flips out. There is a tag, and also a little sewn gatefold book with eight pages in each side.


When you open the flip up section on the next page, there is another flap to flip up, and a three way flip out section blow it. In the side pockets of that section are two more tags. I forgot to take them out and photograph them separately.


The page on the left contains a pop up album. The photo at the bottom of this image shows the album open.

The one on the right has a flip up, and also a flap to open to access the inside of the back envelope.


I didn't embellish the back of the album because it will mostly be laying down on surfaces, which might catch and tear any embellishments.

Every section of this album except for the smaller items is large enough to hold a 4x6 photo.

Wednesday, March 21, 2012

Peacock Tiles.


I didn't have time to make anything today, but I did do these kaleidoscopic tiles from photographs I took of peacocks. The digital files are for sale in my etsy shop.

They are .tif files at 300 dpi, sized for four inches, but could be made larger or smaller to use as teabag tiles or as backgrounds for cards.

Sunday, March 18, 2012

My Second Album is Finished


The beautiful Botanica Bella paper by Graphic 45 had one of the designs printed on heavy glossy cardstock for the back of the paper stack. I decided to use the glossy printed one on the back and front of my album.

I sure wish Graphic 45 paper was easier to get in my area, because I love their designs. The most difficult part is deciding which side of the paper to use, since on almost all of my projects one side is always hidden from view.

Anyway, this is the front of the album. It is mounted on a 6x9 envelope. The central motif is mounted on foam tape, and the two corner motifs are mounted a little higher to give plenty of dimension to the cover.


The inside of the front cover has a flip up flap. Photos could be mounted on both sides. under the flap, there is access to the inside of the envelope, which can be used to hold more photos or memorabilia. There is also another flap which flips up, providing more space for journaling or photos. The tag slides into the butterfly strip to hold everything in place.


The next page has a tag for journaling or photos holding down a square flippling section.


This photo shows how the section flips out into a twelve inch square. This section can be used for photos and journaling.


The next page has two booklets to hold photos and journaling. I forgot to take pictures of the inside of the one with the fish.


I love the paper on this page, so I wanted to cover as little of it as possible. I made two little booklets for journaling or pasting little photos or memorabilia. One booklet flips open like the earlier page, and the other is accordion folded. On the sides with the busy patterns, I glued tags from the paper stack for added interest.


This page has a flip up section for photos, and behind it are three tags for journaling or photos. There is also a motif with ribbon woven through it on one side.


This page has a little four page booklet for photos or journaling under the raised pocket and raised tag. The whole page also flips out revealing two more places for photos inside.


Inside the pocket on this page is an accordion fold section for more photos and journaling.


This section has gatefold doors to reveal another spot for photos. It is decorated with diamonds of paper from the stack, and has half pearl doorknobs.


The pocket on this page contains two tags for journaling and photos.


Inside the back cover is another spot for a photo. It is also done on a 6x9 envelope. The flap opens up to give access to the inside of the envelope, providing more space for storing extra goodies in.


The back of the album is not dimensional. I glued the motif on flat because it will probably be lying down on a surface most of the time, and I figured it would be more durable this way.

The whole album is bound in my Cinch, and I used old photo distress stain around the edges. There are a few other brands of paper used, but the majority is Graphic 45. Most of the places for photos are sized for 4x6.

This item is for sale in my Etsy shop.

Saturday, March 17, 2012

Marianne Design is giving away Candy!


To win this candy, click here!

Working on another album


This is an example of some of the pages. I have mostly used Graphic 45 Botanica Bella paper. I love the Graphic 45 paper, but no one carries it in my area. I got this when I was in Rochester, NY, but they only had this G 45 paper, and only one pad of it. Since I can't get any more easily, I am having to use other papers when I run short of a particular design.

Wednesday, March 14, 2012

The Finished Album


This is the finished album. Half of the front flips open. I have placed a light colored panel on the right hand flip open side so it can be labeled if the user desires. The pearl represents a door knob.


This is the front flipped open. There is a panel for a 4x6 photo with a label below, and a journaling panel on the flip up side.


Inside the front cover is a place for a photo, and one for journaling. Ooops, I flipped the photo instead of rotating it, the binding holes should be on the right hand side.


This is the back cover. I flipped it instead of rotating this one too. The binding holes are really on the opposite side.


Inside the back cover is a raised panel which holds two removable panels.


This is the front of the panels. Each has a place for a photo, and one for labeling.


The backs of the panels are for journaling.

Making this journal was a lot of work, but it was a lot of fun! If you would like to make your own, be sure to visit Susie McGuire at the Creative Cafe for her wonderful tutorial.

Also, be sure to see part one and part two of this album, which I posted over the past few days to see all the pages.

This item is for sale in my Etsy Shop.

Tuesday, March 13, 2012

Day Two of my Latest Album


I decided to make another set of half pages to tie in with the pages I made yesterday. The photos above are the front and backs.


This looks like another set of half pages, but it has a surprise.


The top one is a seven page album that flips up, and the bottom one is a seven page album that opens horizontally.


The backside has two places for more photos.


This page has a raised pocket holding another surprise.


A little standup album I made the same way as my circle album, only this one is square. When you fold the two covers together in an open position, it forms a square with places for eight photos.


This looks like an ordinary page with places for two photos.


Each one opens to hold more photos.

Hopefully, tomorrow I will have time to do the front and back covers and bind it all together!

Monday, March 12, 2012

Working on an Album, and a wonderful Blog

Today I found a wonderful blog, Creative Cafe, with tutorials for really fun albums. You can see the blog here. I had always wanted to make one of those complicated albums, but it's easier when you follow a tutorial for the first time. Since my internet is too slow for utube, and I don't have sound on my computer, I had never tried them.

Susie McGuire made such beautiful albums, that I sat through all those little dots that keep circling, and did my best to try to follow her instructions. I didn't have any of the envelopes she used, so I improvised, and also improvised on sizes, since I have no idea what size everything was. You need sound for a lot of the info! If I can get this far without sound, and seeing mostly dots circling around rather than video, I'm sure those of you who have real internet and sound should have no problems following the tutorials.

I've still got a lot of pages to do, and hope to do more tomorrow, but this is what I have so far.


This is the first page I did when everything is put together. There are two long panels for photos and journaling which are held in place by the tab. Under that, are two smaller panels for photos in pockets mounted on the page.


This photo shows the page without the panels inserted. The two longer panels have a place for a photo and a smaller place below to write on. The smaller panels are just made to mount a photo on.


This photo shows the backs of the panels. I have used a lined DP on the backs of the longer ones for journaling or notes about the photos on this page of the album.


This photo shows the next page. It has a band holding an envelope which contains another panel for journaling and photos. I didn't notice until now that I inserted the envelope upside down when I took the photograph. I made the envelope myself with no instructions, and was happy with the way it turned out. Sometimes I surprise myself!


This is the page with the envelope removed. The page is right side up this time.


This panel goes inside the envelope. It contains a place for a photo, and one for labeling.


The back side of the same panel has lines for easier journaling.


This is actually a split page, I should have seperated them in the photo to make it easier to see. The two sections are to mount photos on. Ooops, this photo is also upside down. The binding holes should be on the left.


The backs of the two sections also have lines for journaling.
These will actually be behind the sections I hope to make tomorrow. Tomorrow's pages will be quite complicated, with flip up little books on the sections.

I have used various brands of paper for my journal, I just chose a bunch of what I had in shades of brown. They were very easy to punch in my Cinch.

Sunday, March 11, 2012

Sparkly Butterfly Card and Shimmery Mists


I sure wish this photo looked as pretty as the card turned out, but it seems like they always look better in person than in photographs. The butterfly wings are also bent up, but you can't see it in the photo.

I started out to make a card for this week's Just Rite challenge, but somehow, with spring coming, I couldn't get into black and white, so I made this card instead.

I have always wanted some Glimmer Mist, but it was never available here. When I was in Rochester, NY taking care of the grandchildren over the last couple of weeks, I got to Hobby Lobby and Michaels again. Between the two stores, they had four different brands of the shimmery mists, so I bought a set of each kind to see which I liked better. One set was a Perfect Pearls set with heirloom gold and pearl. I liked the pearl, but the gold is too dark for my taste. I only sprayed a sample of each, so I'm not sure how I like the spray pattern.

The second set is from Tsukineko, and included silver and gold. Both colors are very pretty, but the gold is especially gorgeous. I only sprayed a small sample of these as well, so I'm not sure about the spray pattern on them either.

The third set was Smooch, and it included emerald green and yellow. Both colors are gorgeous, but when spraying a sheet with the emerald, I found it to be very messy and blotchy. It would be good for someone who likes a spray pattern, but I found it difficult to get an even pattern with it. That is the color I used for the background in this card. I also had emerald hands when I got done with it. The smooch seemed to get all over everything, but I will probably want more because of the gorgeous colors.

The fourth set was Glimmer Mist. The set I got had lemon, red, peach, and iridescent gold. Those colors were beautiful too. I used the iridescent gold on the fence, butterflies, and saying on this card. I found that the GM spray pattern was very nice, at least on the iridescent gold, but I haven't tried any of the colors yet except for the small sample I sprayed.

It was really fun working with such nice shimmery products, and it makes my card look like spring!

The border and butterflies are Martha Stewart, and the saying and frame around it are Just Rite. I used Versamark ink gold detail embossing powder on both, including the borders, and mounted them using dimensional tape.

After doing the borders around the frame and saying, I decided the border looked flat, so I used a Sakura Quickie Glue Pen around the edges and the same embossing powder. What I hadn't counted on, was that there was some leftover glue from my Xyron in the holes in the border. At first I was really upset, then I realized that once it was embossed, it might not matter if the nooks and crannies had gold embossing in them, since there is a gold sheen in the green shimmer as well as in the white.

I decided not to risk ruining the butterflies by embossing them, so I used a Pentouch to outline them.

After mounting everything, I added dots of green Stickles to the flowers, around the saying, and for the butterfly bodies.

In person, the saying is much easier to read, and the card is very shimmery with sparkly accents.

Friday, March 9, 2012

Very Flowery Easel Card


I tried out this Martha Stewart Punch Around the Page for the first time, and it reminded me of a cutwork embroidered handkerchief, so I wanted to add flowers to represent embroidered flowers. Unfortunately, I didn't have enough of my favorite discontinued Prima flowers, so I used these Darice ones, which really aren't made for paper crafts, but they work. I couldn't cut the stems off, because the ribbon they are made of would have unrolled, so I coiled it. They'll have to do until I can place an order with Wild Orchid, which carries some roses which look like the same ones Prima used to sell.

The paper is all Core'dinations Pearl, and the bottom and top are the same color, in spite of the fact that I couldn't get a photo where they didn't look different.

I started with pale pink pearl, then punched a white square, and a smaller pale pink square for the card front and base. I then mounted the flowers and added some real half pearls, and some liquid pearls to the punched flower centers, and around the Spellbinders die cut. The flower in the center is from K&Co.

For the base, I added a resin saying I got years ago from Anna Griffin, and used two flowers to support the card when open. Originally I tried pearls, but they wouldn't hold it open.

Tuesday, March 6, 2012

Back from Vacation

I just arrived at home from our vacation and two more weeks of helping out our son and Daughter in law and the grandchildren.

I'm trying to catch up on all the new posts on my favorite blogs. You all have done some beautiful things in the three weeks that I was gone. Hopefully I will have some nice new things to share with all of you soon!