Pazzles Bar

Get the Pazzles Inspiration, the most comprehensive electronic die cutter available, for as little as 99 dollars down.
Showing posts with label Vellum. Show all posts

Sunday, March 31, 2013

Yellow Best Friends Card JRC#093


This will probably be my last vellum card for a while, I got some more cigar boxes, so I've started working on those. Anyway, this one is also for the JustRite Friday Challenge #093 - "Suddenly Spring".

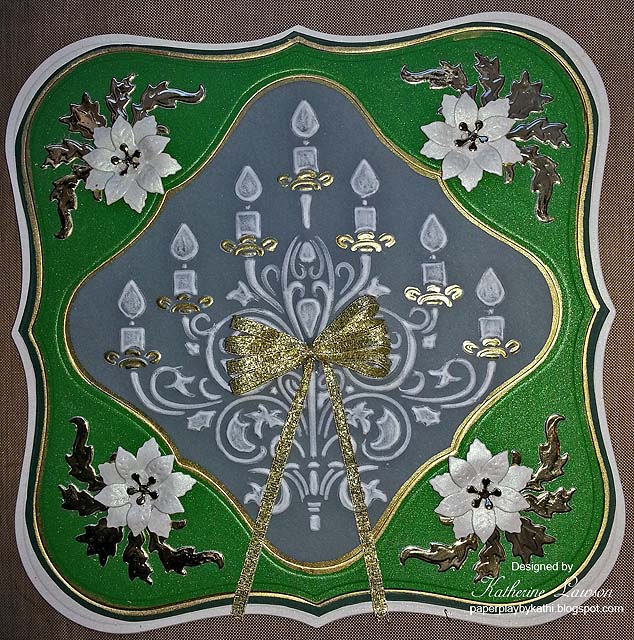
I used another Cuttlebug Embossing Plus folder for this one, and decided on a nice sunny yellow for it. The vellum was mounted onto yellow paper with green brads, then matted with green CS and gold mirror card. I again used JustRite's Vintage Oval Labels Set, which was stamped with Memento Bamboo Leaves and embossed with clear EP. Since I don't have the die for this one, I fussy cut around the stamp, then mounted it dimensionally over the cut out oval. It was colored with GellyRoll pens.

Prima flowers and daisies I made from punches were added, then I used a gold pen on some of the embossing. I had originally used a white pencil on the embossing, but after I finished the card, I decided it would look better in green, so I used a Ranger nib and the Bamboo Leaves to recolor the embossing.

Yesterday we went off the island again. I brought the cigar box I made into the tobacco shop to show the owner. She liked it so much she wants to buy it, and also wants me to make two more for her. She wants one for herself, and one for each of her daughters!

It's a long story about the cigar boxes, but the owner had gotten ripped off on them a few years ago, and had stopped giving them out. She gave me the one a few weeks ago out of the goodness of her heart, and when I brought the finished box in to show her, she was really happy with what I was using them for. She gave me quite a few boxes yesterday, some are nice, and some are just okay. Some don't have tops, but it was all she had, and I figure I can make shadow boxes or something with those.

She said the box I had done was something called Robusto, and that she should have more of them soon, so she is going to save them for me. I think those are the ones she wants to buy, but a lot of people saw my box, and want me to make more for them too, so I started working on the ones I have which have covers. She wants me to keep making them to sell so I can get extra money, which is really nice of her!

I did get some acrylic Krylon to spray on the box, but I didn't read the ingredients, and apparently all Krylon has acetate in it. It removed a little of the gold on the mirror card, but not enough to show. I think I need to try something else to protect the boxes with. I'll try Mod Podge again as soon as I can get off the island, and then try spraying them if they need it.

I was also attaching the paper with my ATG, which worked really well, but now I'm out of tape with no way to get more for a while. Luckily I have some Score-Tape. Hopefully that will stick as well as the ATG. I gave up on sticking things down with Mod Podge years ago, because they always rippled when we got foggy weather.

Anyway, I think you will be seeing quite a few cigar box projects from me. It think I will make albums to put in some of the ones with sliding tops, and maybe even miniature scenes!

Friday, March 29, 2013

Blue and Gold Garden Card JRC#093


I had so much fun embossing my vellum yesterday that I did another card. I decided to do this one in blue, for one of my most faithful followers, Myrna. :-)

Since this one uses a sentiment and rose from the JustRite Spring Rose Medallions Set, I am entering it into the JustRite Friday Challenge #093 - "Suddenly Spring".

I used a Cuttlebug Embossing Plus folder for this one. After embossing it, I stenciled the raised parts with white ink, and went over the straight lines and edge with a gold metallic pen. This folder is large, so I added it to a blue card using gold brads. The sentiment was added to labels which were cut with Spellbinders Labels Four. The labels were shaded with Brilliance Sky Blue and outlined with gold. Then I used VersaMark and gold EP for the sentiment and rose. I wanted the rose to show up better, so I colored it white with a white GellyRoll pen.

The butterflies are one of the MS butterfly punches where you stamp, then punch the butterfly. I have a couple of those punches, and I'm not crazy about them, but I wanted tiny blue and white butterflies with gold accents, so I used them. I finished it off with a gold bow.

Thursday, March 28, 2013

Vellum Best Friends Card JRC#093


I haven't done any challenges for a while, and when putting the flowers on this one, it reminded me that it would fit the current JustRite Friday Challenge #093 - "Suddenly Spring".

When I was thinking of a card to make, I realized that I hadn't used any embossing folders on vellum for a while. I also hadn't used this Marianne Designs folder for a long time, so I decided this was the time to use it.

After embossing the vellum, I trimmed it and mounted it onto linen textured pink CS using matching pink brads. Then I matted it with gold mirror card and more of the pink CS and mounted it onto a white card.

This tag from Spellbinders looked like it would work with this folder, so I cut and embossed it with the pink CS. Then I decided to add gold touches to it, and to the embossed vellum using my PenTouch pen. I took two photos of the card. the top one shows the card better, but the bottom one shows the gold better.

When I am trying to find a sentiment that fits the tags, I usually go through my JustRite stamps first, because I have so many of their sentiments in different sizes. The center of one of the stamps from the Vintage Oval Labels Set fit in the oval almost perfectly, so I stamped it with VersaMark and embossed it with gold EP. This was cut and embossed with the same Spellbinders tag, then I trimmed off the flourishes, leaving just the oval. I added a touch of brilliance pink in the middle of the oval to make it match the card.

To finish the card, I added some roses and white pearls. Then I decided the brads would look better if they were pearls too, so I took my white Liquid Pearls and put them on top of the brads.

I know my blog friend Jill will like this card because it is pink. Sorry Myrna, there isn't any blue in this one.

Saturday, March 2, 2013

Parchment Craft Butterfly Card


This is another card I'm not entirely happy with.

Back in the 60s through the middle of the 90s, I did a huge amount of needlework, and in the 80s, I even had a column on needlework in the newspaper. At that time, I collected a lot of needlework books. I did a ton of cross stitching, petit point, and even did needle made lace of every kind. I did so much of it that I burnt myself out, and can't even bring myself to do it now, even though I've started some projects.

Anyway, I was looking through some whitework embroidery books, and came across this butterfly in the book White Work Techniques and 188 Designs, which I purchased back in the late 70s, when it first came out.

I decided it might work for parchment craft. I probably should have scanned it and made it smaller, because the smallest sized card I could use it on was 8 1/2" x 5 1/2". After embossing it and coloring it on the back with Copics, I knew it needed something else, so I added the flowers on both sides.

I knew it needed some kind of a frame, so I used Spellbinders Grand Labels Four, using the negative part for the frame.

After layering everything together onto the card and outlining the inside of the frame with metallic gold, it looked kind of empty at the top and bottom, so I used white Liquid Pearls to add dots above and below the butterfly, then added them to the corners of the frame.

It probably would have been pretty if I had made it smaller so there would have been more room for matting and framing. As it was, the only size die that would fit both the card and butterfly went right to the edge of the card.

Wednesday, February 6, 2013

Parchment Craft Card


Years ago I used to do parchment craft. I had very few tools, just a bunch of embossing styluses. Yesterday I tried it again for the first time in about 20 years. The design for this card came from the book Parchment Craft by Janet Wilson.

When I used to do it, I was able to get regular parchment paper, but now all I can get is vellum, so that is what I used. The dark parts in the butterflies and flowers are actually the same gold as on the borders, but for some reason it showed up dark in the photo. I started with a very simple design because it's been so many years since I've done this.

The card also doesn't look as blank as this in person. Instead, it looks classy. :-) I purposely didn't add any embellishments because in person I like the effect of just the layers of matting and borders.

Saturday, February 2, 2013

PSX Lupine and Vellum Card


I haven't used vellum in a long time, so I decided to use this PSX Lupine stamp. This card didn't come out at all the way I had planned. I stamped the Lupine onto vellum with VersaMark and embossed it with white EP, then colored the Lupine on the back side of the vellum with Copics. Actually the Lupine didn't have large enough petals to shade well and have it show up on the front. The vellum was supposed to be mounted onto light pink paper, but the Copics didn't show up well on that at all. The only thing that worked was white CS.

Next, I mounted the vellum onto the white CS using tiny deep pink brads, and used a Krylon pen to go around the edges. That was matted onto Core'dinations gemstones, dimensionally mounted onto Anna Griffin DP, then more Gemstones, and then a white card. All the layers were outlined with the Krylon pen. This card isn't as bright as it looks in the photo, and is really a little pinker rather than being as peachy as this.

I added some gold pearls as accents, then I tried a ton of bows, but none looked good any where on it, so I added some gold outline stickers to the corners. After that, this little bow didn't look quite so silly as it did without the corners.

After I had used the gold pen around the vellum, I had noticed that the vellum lifted up a bit at the bottom. I was hoping it would settle back down, but it didn't. Since I couldn't take the brads off after it was mounted onto the paper below, I decided to try a little bit of Glossy accents to take the little pucker out. They show a little bit, but not too bad. I also didn't notice that when I pushed it down into the glossy accents, I pushed the bottom of the dimensional layer down as well. I just went over and slid my fingernail under it, and it's back up and the whole bottom is level now, but not in the photo. Maybe I will rephotograph it tomorrow if it gets light enough. (We are going to get snow, so I hope it isn't really dark tomorrow).

Anyway, I guess the card is okay, but it isn't what I expected.

I was thinking of you when I made it Jill! :-)

Saturday, October 13, 2012

Marianne Designs Vellum Candlabra Card


I made this card using one of the Marianne Designs Star Collection Stencils I got from Kamya this week.

The candlabra was embossed on vellum using a small stylus, then I used a white pencil to lighten the embossing. The medium green pearl card was cut with two sizes of Spellbinders Grand Labels One. The smaller one was placed on the diagonal inside the larger one to cut a window for the vellum, then the vellum was attached to the back.

Next, I cut a larger piece of dark green CS for a mat for the lighter green, and to back the vellum so the embossing showed up better. The layers were mounted onto a larger sheet of Core'dinations white pearl CS, then I did a bunch of outlining and accented the candlabra with a gold pen. My outlining could have been neater. It was kind of hard to work today because it was only 46 degrees here today, and we only have a couple of small electric heaters in the shop, and I was freezing. I suppose we will have to close soon.

Anyway, next, I made a back for the card by cutting another sheet of the white pearl CS with the same size die as the card. I folded the top inch or so of this die cut, and lined up the bottoms, and attached the top folded part to the back of the card. I had to devise a way of attaching the back because the card is over 7" square.

Last, I cut some Marianne Creatables poinsettias and corner decorations out of the white pearl CS and some gold mirror card to embellish the corners. Then I added a bow.

Sunday, October 2, 2011

Embossed Vellum Christmas Card


I used a Marianne Designs embossing and cutting folder in my Sizzix Big Kick for this card. I enjoyed doing the pink Cuttlebug Plus one so much, I had to try a Christmas one. I wanted to do this one entirely by embossing, so I used a brass poinsettia stencil I've had for years, and embossed that part on a light table.

I mounted the vellum on green card stock with brass brads. The green is mounted on gold mirror card, and that is mounted on a white card.

I finished it off with green Queen & Co. rhinestones, and made a bow out of narrow gold ribbon.

Wednesday, September 21, 2011

Embossing Plus on Vellum


I just did this card today, and the technique worked really well. I decided to try an embossing Plus folder in my Sizzix Big Kick using vellum instead of card stock.The pinks in those little flowers came out looking flourescent in the photo for some reason, but they really aren't. They are the same colors as the rest of the pinks.

First, I cut the vellum a little larger than my EP folder, then ran it through the Big Kick. I mounted it on linen textured pink pearl paper from Core'dinations with pink metallic brads. I find that using an ordinary push pin is a great way to make starter holes for the brads. Then I mounted it all on a white card.

I then cut out another oval in regular white card stock from another EP folder, and mounted that in the center of the vellum oval.

I added two simple flowers made from an EK Success punch with centers made from a flower shaped hand punch, and I raised the petals a bit and put them in the centers of two of the embossed flowers.

I made a rolled rose from one of the circles from the Spellbinders blossom die and mounted it in the center. It's the first time I have tried a rolled rose, and it was really easy. Next time, I will try shading it and curling the petals a little before putting it together.

Finally, I added Queen & Co. pearls in two sizes.