Pazzles Bar

Get the Pazzles Inspiration, the most comprehensive electronic die cutter available, for as little as 99 dollars down.

Saturday, October 20, 2012

Roses and Daisies Card using Noor! Creatables and Spellbinders


I love mixing and matching dies, and love showing how you can use so many from different companies on one project. This card uses Three Creatables dies from two different sets, one Noor! die, and five Spellbinders dies from two different sets.

I made it in pink, because pink cards always make me think of one of my most loyal blog friends, and that makes me happy. Hi Jill!

Anyway, for this card, I used pink and white Core'dinations Pearls papers for everything but the rose and daisies. I die cut a card from the white pearl using the largest square Creatables die, then cut another white one to layer over the card base, so the design would be full sized at the top. Then I cut the next size smaller scalloped square from the same set in pink, and layered it over the white one.

The white lacy one is one of my new Noor! dies, then the round pink one is from a different Creatables set.

I made the leaves using the Spellbinders Foliage die, cutting them twice, then used a rose I had already made using the Spellbinders Rose Creations die. The rose is made with the four smallest dies from that set. I cut the largest of the four twice to make two alternating rows of the largest petals, and the three smallest ones once each.

I made the rose a few weeks ago using ordinary white CS and a pink Brilliance stamp pad for shading. The daisies are from two sizes of daisy petals from two different punches layered with Liquid Pearls in the centers. I made those months ago.

I sort of wish the rose was closer in color to the pink paper, but I don't have a matching pearlescent stamp pad for that. This is the closest pink I have.

Friday, October 19, 2012

Christmas Cactus Card using Noor! Dies and Spellbinders


Gosh, this photo looks much brighter on my blog than it does in real life. The red and green are not quite so bright in person, and look much better together than they do on here.

Anyway, I made this card using one of the Noor! dies I got yesterday. I used a metallic Gold stamp pad to color the embossing while it was still in the die.

I used this K&Co tag mounted onto two sizes of Spellbinders scalloped circles which I outlined with a gold pen. The circles and tag are mounted dimensionally.

I outlined the red background paper with a gold pen, and added red pearls to the corners.

Thursday, October 18, 2012

Creatables Gold and White Square Card


Today I received four Noor! dies, and one Creatables set. They were all so beautiful it was difficult to decide which one to use first! The first thing I did was to cut and emboss each one of them out of Core'dinations Pearl paper. Then, I decided to use the square Marianne one.

I decided to make it cream and light gold, so I cut two more of the die shapes out of Core'dinations pale gold pearl CS, and another of the centers out of the white pearl. I layered them together, and decided to use a gold metallic stamp pad and my sponge daubers to highlight the embossing on one of the diecuts, and shade the center of it, as well as to run it around the outside edge of the outside die cut to define the edges.

Then I used the outside die to cut a card out of the white pearl, and mounted everything on that.

I had originally planned on using the center medallion by alternating two of the motifs and shaping them into a flower, but it didn't work for me, so I layered two sizes of daisies instead, and colored the stamen metallic gold with a gold pen. The daisies are actually off white, and quite close in color to the pale gold. The two medallions show behind it and look like a little doily under the flower.

Wednesday, October 17, 2012

Marianne Creatables and Star Collection Card


This card uses a Mariane Creatables die, and a Star Collection stencil. The base is made from the stencil. I embossed it on a light table using the PD0015 stencil, and only embossed up to the line below the point. Then I flipped the stencil vertically and embossed the same half again on the opposite end. After folding in half on the line, it made a stand for the card.

Then I cut out the Marianne Creatables circle for the top. I matted everything with light blue, and cut the flourishes behind the flower with the same blue. I added a blue flower I made from Prima flower parts, and decided to shade the raised parts of the stand with a matching blue Pebbles cream chalk.

I had originally pricked the embroidery design with a needle and was going to embroider it, but in person the prickings look nice, (they are so fine that they don't show up in the photo), and I decided it probably looks better pricked than it would embroidered on this card.

Last, I added Liquid Pearls. This card stands up by opening the bottom part, but the Liquid Pearls were still wet when I photographed it, and I didn't want to mess it up if I moved it around too much, so I photographed it lying down flat.

Tuesday, October 16, 2012

Spellbinders and Noor! Snowflake Card


I am still waiting for my Noor! dies to get here, but I wanted to use the one I already have, so I made this card. This die came from Kamya, and got here really fast, it only took two days, but they only had one of the Noor! dies I wanted. (They did have a lot of the Star Collection stencils I wanted though).

I wanted to make a snowflake looking card, so I played with the Spellbinders Persian Accents and matching Motifs dies, and this is what I came up with. I used Pebbles Cream Chalks to color them while still in the dies. They were cut from Core'dinations Pearl CS.

I mounted them onto a sparkly light blue CS, and matted that with gold mirror card. The card itself is made from more of the Core'dinations Pearl.

The corners are the Noor! die I got last week. I love these corners, they are small enough to fit onto a lot of cards, and work really well with circular designs.

They are actually straight on this card, but the mirror card curls a bit, so I frequently have to flatten my cards that use it on. I took the photo before I flattened the card.


Monday, October 15, 2012

Reindeer Card JRC#083


I made this card, then realized that it qualifies for JustRite Friday Challenge #083 - "Three's Company", so I'm entering it there.

I was going through my K&Co stacks, and saw this paper, which matches one of their Christmas tags, and decided it would make a pretty non traditional Christmas card. I matted the tag onto a gold and a blue sheet of Anna Griffin paper which coordinated well with the K&Co paper. They were cut and embossed with Spellbinders Labels Eighteen.

Next, I stamped a sentiment from JustRite's Noel Christmas Ornaments onto ivory CS using Distress ink, and shaded the tag with that, after cutting and embossing it with the same die set. The sentiment was matted with the same blue paper as I used to mat the tag.

The front of the card was also matted with that blue paper before being mounted onto an ivory card.

Everything was outlined with a gold pen, and I added pearls to the corners.

Saturday, October 13, 2012

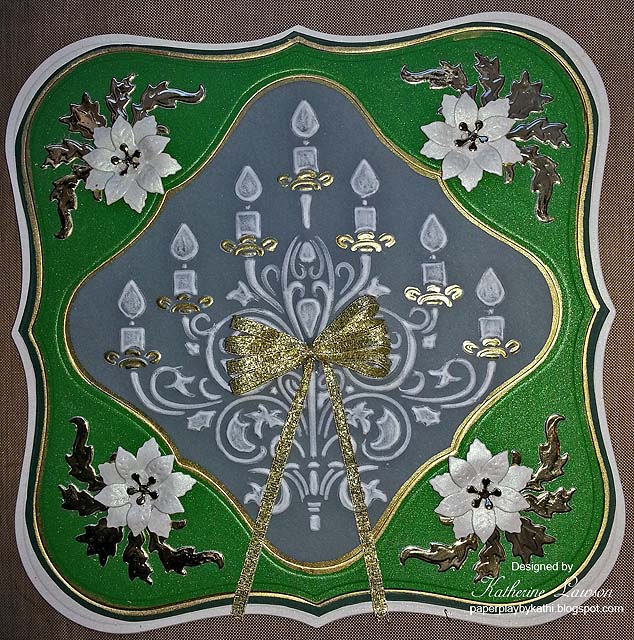
Marianne Designs Vellum Candlabra Card


I made this card using one of the Marianne Designs Star Collection Stencils I got from Kamya this week.

The candlabra was embossed on vellum using a small stylus, then I used a white pencil to lighten the embossing. The medium green pearl card was cut with two sizes of Spellbinders Grand Labels One. The smaller one was placed on the diagonal inside the larger one to cut a window for the vellum, then the vellum was attached to the back.

Next, I cut a larger piece of dark green CS for a mat for the lighter green, and to back the vellum so the embossing showed up better. The layers were mounted onto a larger sheet of Core'dinations white pearl CS, then I did a bunch of outlining and accented the candlabra with a gold pen. My outlining could have been neater. It was kind of hard to work today because it was only 46 degrees here today, and we only have a couple of small electric heaters in the shop, and I was freezing. I suppose we will have to close soon.

Anyway, next, I made a back for the card by cutting another sheet of the white pearl CS with the same size die as the card. I folded the top inch or so of this die cut, and lined up the bottoms, and attached the top folded part to the back of the card. I had to devise a way of attaching the back because the card is over 7" square.

Last, I cut some Marianne Creatables poinsettias and corner decorations out of the white pearl CS and some gold mirror card to embellish the corners. Then I added a bow.

Friday, October 12, 2012

Lea'bilities Holly Card


For a few months I have been wanting some NOOR! Design dies. Finally, this week, I sent for a few. One of the places which were listed as carrying them was Kamya. I went to their site, but found only one that I wanted, and it's only a tiny corner die, so I'm waiting to use it. While there, I decided to order a couple of the Star Collection stencils by Marianne Designs that I have been wanting, a Cheery Lynn die, and an interesting holly die by Leane Creatief BV. Now that I have tried this die, I know I need the Holly Border one that matches it!

More of the NOOR! dies I wanted should be here sometime soon. I ordered those and a new Marianne Creatables die from Ecstacy on the same day.

Anyway, since this is a very fine die, I used wax paper when I cut it, and I had no problems removing it. Without wax paper, I expect it would tear.

The die set consists of the two holly borders, plus three small fancy squares. I altered the direction of each die, using every other one as a diamond shape, rather than using them all as squares when I put them on the paper. This gave me a few larger spaces in each corner to add an embellishment.

I used a mossy pearl paper and a lighter green linen textured paper from my stash for this card.

The four little flowers in each corner were made from small punches. They were shaped and the layers were alternated. The center flower is made from two sizes of the Marianne Creatables small poinsettias. Those were also shaped.

To finish, I added gold Liquid Pearls to the centers of the flowers and at various points on the design.

It was supposed to be a Christmas card, but with these colors, and since the flowers don't look like poinsettias, it could be used for any occasion.

Now I need the holly border that goes with it. I think the holly leaves can be cut from the border and used in the corners of this die to change the look.

I'm really happy with this die set!

I'm also making another card like this in red with white, which is almost finished, and want to do one in blue with white. Now that I think of it, pink with white would be pretty, and so would a lot of other combinations. It seems to be a very versatile set!

Thursday, October 11, 2012

Wishing you Joy Card


This card is made with JustRite's Noel Christmas Ornaments set.

The ornament was stamped onto Core'dinations Pearl CS using VersaMark and embossed with Super Fine Detail Gold. Then it was cut with the matching Spellbinders 2010 Heirloom Ornaments.

The light green shading is done with Memento Cottage Ivy. I used a sponge dauber for the label part of the ornament, and a bullet point Fantastix for the smaller parts of the ornament. The darker green is Copic, and there is actually a golden yellow Copic used in the narrow outlines, but it doesn't show in the photograph.

After coloring the ornament, I tried it on different papers and decided on this K&Co one, then tried to find something to fill in the blank space on the paper. I decided on this old Wright's trim, and glued it to the DP and the gold mirror card under it, then applied the ornament dimensionally onto the card. (I used the cottage Ivy around the white card as well).

After applying the ornament, the card needed something, so I added the gold outline stickers and a bow, but I didn't really like it. I wish I hadn't added the trim. Trying to salvage it, I added some pearls. It still needed something, because the stickers looked flat and uninteresting, so I colored the holly leaves with the same dark green Copic I used on the ornament. It looked a little better, but I still wish I hadn't added the trim.


Help designer Darsie Bruno recover from a fire in her home

I have just learned that designer Darsie Bruno's home was destroyed by fire.

You probably have seen some of her beautiful cards on many sites, since she was on a number of design teams, including JustRite and Spellbinders.

For more details on the fire, and how you can help Darsie and her son, go to JustRite's page here.

Thank you.

Wednesday, October 10, 2012

Peace on Earth Card


I love these Spellbinders Decorative Labels Eight, and decided to cut them out with Core'dinations Gold Pearl CS. Then I had to find some paper it looked nice on.

The best paper was this Anna Griffin pine cone paper, so I made a Christmas card. I cut the pinecone paper to fit using Spellbinders Labels Eight for the largest and smallest rectangles, but since the Labels Eight don't have a size for the second largest, I traced the inside of the Decorative Labels die and cut it out with scissors to fit.

Then I used a 5x7 card, and cut another gold sheet for a mat, and another pine cone sheet to mount everything onto.

I added the K&Co sticker to the center, and added some branches made with a McGill punch. The McGill punch is almost identical to the MS branch punch, but it is quite a bit larger, and looked better for this particular card. I like having the choice of both sizes. Then I added roses and pearls to finish the card.


Tuesday, October 9, 2012

Ocean Tryptic Card JRC_083

Here is my second card for the JustRite Friday Challenge #083 - "Three's Company".

This one was pretty easy for me. I had done a similar card a few months ago, only that one had corners that folded down. The woman who bought it wanted me to make another card like that that didn't have corners that fold down so she could put it on her dresser and use it like a tryptic.

This fits the JustRite challenge because it uses six different patterned papers, plus two JustRite stamps.

All DP and embellishments on this card are K&Co.


This is the front. I used JustRite's Sea Shell Bay Labels Twenty Two for the stamp. All stamps on this card were done with VersaFine Onyx Black, and embossed with clear EP. The stamp looks very fine and detailed in person, but my camera's flash made it look funny in the photo. Both this stamp and the next one were also shaded with VersaMagic Aegean Blue and accented/outlined with a gold pen. On this stamp, I also colored some of the details with Copics.

Everything on the card is mounted dimensionally. I added four shells I cut out with scissors to the corners of the front. The label was cut with the matching Spellbinders Labels Twenty Two.


When you open up the front cover you see these two pages with dimensional K&Co stickers decorating them.


This is the card fully open. There are quite a few dimensional stickers here, and another label made with JustRite's At the Beach Oval Medallions.


This is the back of the card. The fish isn't a sticker, it's part of the paper design. I didn't want to put anything dimensional on the back of the card.

Monday, October 8, 2012

Gold Lace Christmas


Here is another Christmas card using JustRite Stamps. It's been a long time since I did a gold and white Christmas card, so I decided not to color this one.

For this one, I used JustRite's Christmas Miracle Ornaments, mounted dimensionally on their Lace Background Stamp.

All the white paper and the card were made with Core'dinations Pearl. Everything was stamped using VersaMark, and embossed with Super Fine Detail Gold. The "Joy to All" was stamped separately, cut out with a tiny Spellbinders oval and mounted dimensionally onto the ornament. I was planning on getting the Spellbinders Ornament Die that goes with this ornament, but I wanted the fancy die that goes with Labels Eight more, so I got that instead. I cut this ornament out by hand with scissors.

The outside of the ornament and the "Joy to All" were outlined with a gold pen. The ornament was mounted dimensionally onto the lace background, and the background was matted with Gold mirror card. Then I added gold pearls to the corners, and white pearls to the ornament.

Sunday, October 7, 2012

Creatables Diorama Card


I made this card from a tutorial by Angie Crockett on the Our Daily Bread Designs Blog. At first, I was going to use a few of my ODBD stamps, but the ones I chose didn't really match up with the size.

Anyway, after trying to plan around stamps, I decided it would be easier just to use some plain paper and a DP for the outside with some Marianne Creatables inside on my first card like this.

I chose a generic dark blue CS, a piece of very old Hot Off the Press paper to cover the front and sides, and Core'dinations Pearl for all the die cuts.

I placed the Creatables villages on the back wall, the sleigh and reindeer on the second layer, and the tree and poinsettia on the front of the card. The frame was cut with a Spellbinders die.

This diorama is two inches deep, with the second layer one inch from both the back and front, so there is a lot of depth to the card. It actually was quite easy to make once I decided what I wanted to go into it.

Friday, October 5, 2012

Gold and Green Ornament Card JRC#083


I haven't entered anything into the JustRite Friday Challenge for a long time, and since I just got all these new stamps from them, I thought this would be a good time to enter again.

This time the challenge is "Three's Company", and we are to use three or more coordinating papers in our creations. This was difficult for me, since I normally don't use too many different colors or patterns of papers on the same card.

As I was going through my stash of Anna Griffin papers, I found some more of these green and gold pine cone papers, and decided to see which other ones would match. I finally settled on a holly paper which matched the green in the pine cone paper.

I stamped the "Merry Christmas" and an ornament from JustRite's Noel Christmas Ornaments set using VersaMark and Super Fine Detail gold embossing powder, then cut the ornament out with the matching Spellbinders 2010 Heirloom Ornaments. For the sentiment, I used Spellbinders Fancy Tags One to cut and emboss the tag, and outlined it with a gold pen to make it match the ornament better. These were stamped on a pearl green CS from my stash.

I cut plain ivory CS to form a 5x7 easel card, and used my Xyron to mount the holly paper onto it, then I matted the pine cone papers with gold mirror card and mounted them onto the holly paper. The ornament and tag are mounted dimensionally onto that.

The card looked kind of dark and plain, so I added some gold outline stickers from my stash, a gold bow I made, and some gold half pearls.


Thursday, October 4, 2012

Christmas Album

I decided to make a Christmas album. I've been working on it for a few days, and finally finished it today. Some of these photos are really blurry. I upgraded my phone, but the camera on this one doesn't seem to be as good as my old one.

This album contains mostly K&Co paper, but a few sheets were from my stash. The album is 6x9, so it will hold 4x6 and some 5x7 photos. It is bound with my Cinch.


The first photo is the front of the album.


This photo is the first page. It has a place for photos, and also has tags. The photo below shows the page with the tags removed, and the front side of the tags.


This page has a flip up to hold two 4x6 photos, with tags behind it. I forgot to take a picture of it flipped up. The photo below is the front of the tags.


This is another page with a place for a photo, and also a little 12 page book sewn with ribbon. The book is 5x5, and contains plain ivory CS. It is suitable for remembrances such as theater tickets, writing in, or wallet sized photos.

The two photos below show the book. The tag on the front is for labeling the book.


This is another page with room for a photo, as well as a separate little book with space for four 4x6 photos. The photo below shows the booklet open.


This page also has a flip up and will hold three photos. I forgot to photograph this one open.


This photo and the one below it show how this page flips open to hold three photos.


This photo and the one below show how this page also has room for three photos.


This photo and the one below it shows a gatefold which opens to hold another photo.


Here is another page with room for a photo. It also contains another ribbon sewn book designed for 4x6 photos. The four photos below show the inside pages and the back cover.


This photo and the one below show the inside back cover. It also has a flip up for photos.


This is the back cover. I hope you liked it, and that inspires you to make your own Christmas album!

Wednesday, October 3, 2012

JustRite Lace and Iris Card


I was really excited when I saw that JustRite had made these lace stamps, and I couldn't wait to get them. I used those and one of my older JustRite sets on this card.

Everything was stamped onto Core'dinations Ivory Pearl CS using VersaMark, and embossed with either gold or white EP, and cut and embossed with Spellbinders dies. The banner and star shape are JustRite Custom dies which match the stamps.

To add contrast to the layers, I used my sponge daubers and a Brilliance pink shade to color just the outside of all the shapes except the star shape. The star is completely covered with the pink ink, then I outlined everything with a gold pen.

The iris is colored with Copics, and the peachy pink shade is closer in color to the paper in real life. All that was needed to enhance the lace were a few pink and gold pearls.

I like making cards which would work for more than one occasion, and thought this card would work for birthdays, anniversaries, or even weddings.

These stamps were also designed for JustRite by the very talented Amy Tedder.

Tuesday, October 2, 2012

JustRite Beautiful Ornament Card


This card was made with two of the stamps I got yesterday from JustRite.

The background is their Christmas Holly Background Stamp, and the ornament is from their Christmas Miracle Ornaments set. Both of these stamps are really gorgeous, and work well together.

They were stamped onto Core'dinations Pearl paper using VersaMark and embossed with Super Fine Detail Gold, then colored with Copics. I used a little Distress Antique Linen to shade them, and a gold pen for the oval frame on the background stamp, and to outline the ornament.

The ornament was cut with Spellbinders Heirloom Ornaments 2010, and a few green pearls were added. The ornament was mounted dimensionally in the center of the frame, and the design was matted with gold mirror card and mounted onto a white card. It looks really beautiful in person, and is one of those few cards I was really happy with when I finished it.

Both stamp sets were designed by Amy Tedder. I just love her designs, and a lot of the stamps I have were designed by her.

This was the first stamp set I have gotten from JustRite that wasn't perfect. It looked like it was off register when it was cut, because all of the stamps were cut very close to the edge on one side, and far away on the other. One stamp was cut into the design so it was unusable, and another was missing completely. I contacted them, and sent a photo, and the good people at JustRite are going to send me a new set! :-)


Fancy fold ornament card


Yesterday I received my beautiful new stamps from JustRite. I didn't get a chance to finish the card I started, so I am posting this card instead.

I was disappointed in this one when I got it done. It wasn't as pretty as I had envisioned it. I wanted to post it anyway, because the little ornaments were quite pretty alone, and I wanted to show them off.

I was playing around with the Spellbinders 2010 ornaments, cutting and embossing them using Anna Griffin glittery paper, and positioning the small ornaments onto the paper so the glittered designs would form the design on them. Anyway, the ornaments are pretty alone, but the card isn't much! The red paper is really a much deeper shade than it looks in the photo.

All the glittery DP is Anna Griffin and the large ornament is stamped onto Core'dinations Pearl with VersaMark, embossed with Super Fine Detail Gold, and colored with Copics. The design on it is an older JustRite stamp.

Sunday, September 30, 2012

Blue Santa Card


This card is another made with Santa die cuts from my stash. I started out by embossing white CS with a Sizzix snowflake EF, Then mounted that onto layers of a blue pearl paper and gold mirror card from my stash. Next, I cut some white CS and a frame from the blue pearl paper using Spellbinders Labels Four, and mounted the Santa onto the white paper. I framed the Santa with the blue frame, outlined the frame inside and out with a gold pen, then mounted it onto the embossed background.

Last, I added gold and white pearls, gold outline stickers, and a bow.

It looks quite plain in the photo, but in person there is quite a lot of dimension.

Tomorrow, my new JustRite Stamps and a new Spellbinders Die should be here. I can't wait to play with them!

Saturday, September 29, 2012

Another Ornament Card


This is another ornament card I made for my shop because my customers keep buying them.

For this one, I used two stamps from Our Daily Bread Designs. For the stamped background, I used one of my favorite background stamps, Joy to the World Hymn, and for the ornament, I used the smaller stamp from their Ornaments set. I cut them out with the matching Spellbinders 2010 Heirloom Ornament, which I also got from ODBD.

All of the white paper is Core'dinations Pearl, and the colored paper is generic. I mounted these all onto a plain white 5x7 card. The stamping was done using VersaMark, and the embossing is all super fine detail gold. The coloring was done with Copics, and the shading was done with Distress Peeled Paint.

Everything was outlined with a Pen Touch Gold pen, and the ornament was mounted dimensionally. I added gold outline stickers and pearls from my stash. I made the bow and decided to twist the two tails before gluing the ends to the card to give it a nicer shape and make it frame the ornament.

Friday, September 28, 2012

Flower and Butterfly Scalloped Card


I am still making mostly Christmas cards because I need them for my shop, but in case you are tired of seeing only Christmas cards from me, I thought I would show you a flowery one I made from another of those K&Co card and envelope kits.

This one was very flowery, and I wasn't sure what to add to it. I started by stamping a sentiment from Our Daily Bread Designs Simple Things Set using Brilliance Sky Blue on Core'dinations Pearl CS. Then, I cut it out with ODBD's Elegant Ovals Custom Die, as well as cutting a larger oval at the same time. Then I ran a blue Gellyroll pen inside the die, and a gold line on the outside edge of each oval, as well as on the outside edges of the scallops on the card. I wanted the oval color to match the card better, so I used Distress antique linen to the ovals. It looks blue in this photo, but in person it looks like antique linen.

The larger oval is mounted flat on the card, and the smaller one is mounted dimensionally on top of that.

The card needed something, so I added a few K&Co dimensional flower and butterfly stickers from my stash. It's a bit busier than I usually make my cards, but it looks pretty in person.


I've been having some busy days

I've only had time to quickly post cards, but not to visit. I'll try to catch up with all of you this weekend.

Thanks to those of you who have been visiting me anyway, especially Jill and Olga. I really appreciate it! :-) Yes Jill, the tree is a Marianne Creatables. There are three of them all the same size, plus she has a few others. This is the only one I have, but I want them all! :-D

Olga, I quickly saw the picture of your marvelous squares in my following thingie. I want those so bad! I can' wait to get over and see your creation.

Got to get to work, I'll try to get caught up with all of you soon.

Thursday, September 27, 2012

Joy Beyond Measure Ornament Card


In my shop, a lot of people are buying cards made with the Spellbinders 2010 Ornament die, so I needed to make more.

I decided to use this older JustRite Stamp set to make this one. Since these were oval stamps, and not made for this die, I used Dresden paper lace to decorate the parts the stamp didn't cover. I sent for some of the new JustRite stamps which were made for the Spellbinders dies a few days ago, and also have one from Our Daily Bread Designs, so I should be able to make lots of these ornament cards very soon! I did stamp, emboss and color a bunch of them at the same time with what I have for stamps, so I will have a good choice to make cards with.

I stamped this one onto Core'dinations Pearl CS with VersaMark, and embossed it with Super Fine Detail Gold. Then I colored it, and the Dresden paper with Copics. Next, I outlined it with a gold pen and shaded it with Distress Antique Linen.

I wanted it to look like it was hanging on Wallpaper, so I mounted it onto this K&Co paper. The DP was matted with a deep red, and both layers were outlined with gold and mounted onto a white card.

Last, I added a bow to make it look like it is hanging, and some deep red pearls to the corners.